Moverio Basic Function SDK
Developer's Guide for Android & Windows
3. Developing Windows Apps
3.1. Summary of Moverio application software development for Windows
Below are the steps required to develop the BT-40/40S Windows applications for Moverio.
Install Windows SDK
The following describes how to install the Windows SDK on a computer equipped with Windows 10.
Acquire Visual Studio 2019
Download Visual Studio 2017 from the following site.
(As of Jul 2019, it is Visual Studio 2019) https://visualstudio.microsoft.com/vs/
Install Visual Studio 2019
Launch Visual Studio Installer and follow the instructions to install Visual Studio 2019.
Select workload
Start Visual Studio Installer and, select "Universal Windows Platform development", ".NET desktop development" and "Desktop development with C++" on the workload screen and install. Please check the detailed procedure on the site below.
https://docs.microsoft.com/en-us/visualstudio/install/install-visual-studio?view=vs-2019
When you are in trouble
Please check Microsoft's Visual Studio documentation.
https://docs.microsoft.com/en-us/visualstudio/?view=vs-2019
Developing an application software
In order to create a desktop application. Choose the workload that fits your application.
Please check the detailed procedure on the site below.
https://docs.microsoft.com/en-us/windows/win32/
3.2. Windows display control
Moverio is equipped with a see-through (transmissive) display. The display control in the Windows desktop application can be controlled by sending a dedicated command using System.IO.Ports.SerialPort which is the standard COM port access API of Windows. You can control the brightness of the display and switching between 2D/3D display modes by using the dedicated commands. The brightness of the display can be adjusted from a dedicated command or can be automatically adjusted according to the illuminance of the surrounding environment. It is also possible to support the display of 3D contents in Side-by-Side format.
Display brightness adjustment on Windows
Moverio is equipped with a see-through type display, and the visibility of the displayed image changes depending on the brightness of the surrounding environment. You can make the displayed image easier to see by increasing the brightness of the display when the surrounding environment is bright and by decreasing the brightness of the display when the surrounding environment is dark.
To adjust the brightness of the display, use the standard Windows COM port access API System.IO.Ports.SerialPort and execute the dedicated command "setbright xx" (xx specifies 0 to 20). Please give me. The brightness of the display can be adjusted in 21 steps from 0 to 20. To set the display brightness adjustment mode to automatic mode, execute the dedicated command "setbright 50". If the dedicated command "setbright xx" (xx specifies 0 to 20) is executed when the display brightness adjustment mode is the automatic mode, the brightness adjustment mode switches to the manual mode.
To get the current brightness of the display, execute the special command "getbright". The command returns 0 to 20 when the display brightness adjustment mode is manual mode, and the command returns 50 when the display brightness adjustment mode is automatic mode.
For the range of display brightnesses that can be adjusted, see Display Brightness Adjastable Range.
Switch 2D/3D display mode on Windows
The Moverio display supports Side-by-Side 3D content display. If the video displayed by Moverio is Side-by-Side type 3D content and you want to control it from the app, use System.IO.Ports.SerialPort, which is the standard COM port access API for Windows, and execute the dedicated command "set2d3d 0" (2D display mode) or the dedicated command "set2d3d 1" (3D display mode). For how to use System.IO.Ports.SerialPort, refer to the document of SerialPort class of Microsoft Corporation.
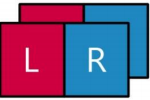
Side-by-Side format is a method to store image information for left eye and right eye side by side in one screen information.

When creating Side-by-Side format video, place the left-eye image and right-eye image in the left and right halves of the video, respectively.
For example, when creating a 1280x720 (HD size) Side-by-Side format image, place a 640x720 image in the left-eye image and a 640x720 image in the right-eye image as shown below.
To switch between 2D/3D display on the display, use the Windows standard COM port access API System.IO.Ports.SerialPort and use the command "set2d3d 0" (2D display mode) or the command "set2d3d 1" (Please execute 3D display mode).
To get the current 2D/3D display mode status of the display, execute the command "get2d3d". Returns 0 if the 2D/3D display mode of the display is 2D display mode, 1 if it is 3D display mode.
Disdplay On/Off on Windows
If you want to temporarily hide the video displayed in Moverio, use the standard Windows COM port access API System.IO.Ports.SerialPort and use the dedicated command "setmute 0" (display lit), Or execute the dedicated command "setmute 1" (display off).For how to use System.IO.Ports.SerialPort, refer to the document of SerialPort class of Microsoft Corporation.

Display distance control on Windows
You can adjust the display distance of Moverio's display using a dedicated API. The dedicated API has a function to horizontally shift the left and right display images. You can adjust the display congestion according to the horizontal shift amount.
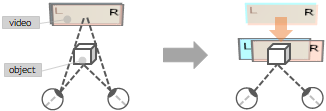
If the actual object is closer than the display distance, shift the left and right images inward as shown below. By doing so, the virtual display distance of the display can be reduced.

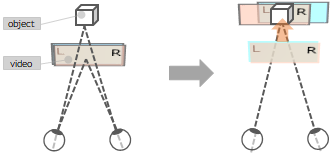
If the actual object is farther than the display distance of the display, shift the left and right images outward as shown below. By doing so, the virtual display distance of the display can be increased.

However, since the left and right images are shifted by using this function, the edges of the left and right images will be interrupted. Therefore, it is necessary for the application to consider the screen configuration according to the amount of video shift. For the relationship between the virtual display distance of the display and the image shift amount, refer to The range of adjustable virtual display distance step and the horizontal pixel shift amount.
To adjust the virtual display distance of the display, use the standard Windows COM port access API System.IO.Ports.SerialPort, and use the dedicated command "setdisplaydistance xx" (xx is the pixel shift amount -32 to 256 Please specify). For how to use System.IO.Ports.SerialPort, refer to the document of SerialPort class of Microsoft Corporation.
For the pixel shift amount that can be specified with the dedicated command, refer to The range of adjustable virtual display distance step and the horizontal pixel shift amount.
To get the current pixel shift amount, execute the dedicated command "getdisplaydistance".
Display automatic sleep on Windows
You can set the automatic sleep setting of the Moverio display using a dedicated command.
When the display's automatic sleep setting is enabled, putting the Moverio on/off and placing it on a desk will turn off the display automatically. Also, the display will be displayed automatically when the MOVERIO headset is installed. By enabling this function, it is possible to reduce the power consumption when the Moverio headset is not installed.
For the automatic sleep setting of the display, use the Windows standard COM port access API System.IO.Ports.SerialPort and use the dedicated command "enableautosleep 0" (autosleep OFF) or the dedicated command "enableautosleep 1". Execute (auto sleep ON).
To get the virtual display distance adjustment value of the current display, execute the special command "getautosleep".
Display manual sleep on Windows
A dedicated command can be used to set the user to manually put the Moverio display to sleep.
If you have enabled the display's manual sleep setting, tap the side of the Moverio to turn off the display. Also, tap the side of Moverio again to show the display. This function can be used when the wearer of Moverio wants to immediately turn off the front image.
To set the display to manual, use the Windows standard COM port access API System.IO.Ports.SerialPort, and use the dedicated command "enableusersleep 0" (automatic sleep OFF) or the dedicated command "enableusersleep 1". Execute (auto sleep ON). For the usage of System.IO.Ports.SerialPort, refer to the document of Microsoft SerialPort class.
To get the virtual display distance adjustment value of the current display, execute the dedicated command "getusersleep".
Creating images for the see-through function
MOVERIO is a device that uses projection technology. This system provides the user with an image projected onto a half-mirror via a light-guided panel, creating a half-mirror version (whereby not all the pixels are needed) allowing images to be arranged over a real-life scene giving a sense of transparency, and creating a more vivid augmented reality experience. To create this transparent background effect, so visual elements (text, graphics...) stand out vividly, the background will need to be set to black when drawing on the projection, so you display the target section overlapping with the actual images.

3.3. Windows sensor control
The Moverio has various sensors in the headset that detect movement, direction, and ambient illuminance. Sensor control in Windows desktop apps uses the standard Sensor API. The sensor data can be used to estimate the wearer's head movement and sense the brightness of the surrounding environment.
Sensor list
Moverio is equipped with various types of sensors.
There are hardware-based sensors such as Accelerameter, Geomagnetic Sensor, Gyoro Scope, and Ambient Light Sensor, as well as software sensors generated from the output values of multiple hardware-based sensors.
| Sensor | Type | Description | Usage |
|---|---|---|---|
| SENSOR_TYPE_ACCELEROMETER_3D | Hardware | The acceleration of Moverio including gravity is measured by the acceleration [G] of 3 axes (x, y, z). | Motion detection (tilt, etc.) |
| SENSOR_TYPE_COMPASS_3D | Hardware | The surrounding geomagnetism is measured with 3-axis (x, y, z) geomagnetism [mG]. | Orientation detection |
| SENSOR_TYPE_GYROMETER_3D | Hardware | The angular velocity of Moverio is measured with the angular velocity [deg/s] of 3 axes (x, y, z). | Motion detection (rotation etc.) |
| SENSOR_TYPE_AMBIENT_LIGHT | Hardware | Measure the ambient illuminance [lx]. | Adjusting the brightness of the display according to the ambient illumination |
| GUID_SensorType_GravityVector | Software | Gravity is measured with acceleration [G] on three axes (x, y, z). | Motion detection (tilt, etc.) |
| GUID_SensorType_LinearAccelerometer | Software | It is measured by acceleration [G] on three axes (x, y, z) excluding gravity. | Application to tap, walking detection, etc. |
| GUID_SensorType_RelativeOrientation | Software | Measure the orientation of Moverio with a quaternion that does not use geomagnetism. | Head tracking etc. |
| SENSOR_TYPE_AGGREGATED_DEVICE_ORIENTATION | Software | Measure the orientation of Moverio with a quaternion. | Head tracking etc. |
| SENSOR_TYPE_CUSTOM (0)*1 | Hardware | Measures the acceleration of Moverio including gravity with uncalibrated 3-axis (x, y, z) acceleration [G] and 3-axis of estimated bias compensation (x_bias, y_bias, z_bias). | Application to motion detection (tilt, etc.) and head tracking |
| SENSOR_TYPE_CUSTOM (1)*1 | Hardware | The Moverio's angular velocity is measured on the uncalibrated 3-axis (x, y, z) angular velocity [deg/s] and the estimated drift 3-axis (x_bias, y_bias, z_bias). | Application to motion detection (rotation etc.) and head tracking |
| SENSOR_TYPE_CUSTOM (2)*1 | Hardware | The surrounding geomagnetism is measured with uncalibrated 3-axis (x, y, z) geomagnetism [mG] and 3-axis calibration information (x_bias, y_bias, z_bias). | Application to direction detection and head tracking |
| SENSOR_TYPE_CUSTOM (3)*1 | Software | Detects the movement/movement of Moverio. | Headset attachment/detachment detection, etc. |
| SENSOR_TYPE_CUSTOM (4)*1 | Software | Detects taps on the headset. | Headset tap detection |
*1 In the case of SENSOR_TYPE_CUSTOM, it is determined by comparing it with the value of SENSOR_DATA_TYPE_CUSTOM_USAGE and the value in parentheses in the above table.
Check the site below for more information.
https://docs.microsoft.com/en-us/windows/desktop/sensorsapi/sensor-categories--types--and-datafields
https://docs.microsoft.com/en-us/windows-hardware/drivers/sensors/sensor-types
Axis of Sensors


3.4. Windows camera control
Moverio has a camera in the headset that captures the front of the wearer. Camera control in Windows desktop apps uses Microsoft Media Foundation, (Link ) hich is a standard Windows camera control API. With this API, you can shoot movies and display previews.
CAMERA Specification
| BT-35E | BT-45C | |
|---|---|---|
| Effective pixel count | 500 milion pixel | 800 milion pixel |
| Capture format | RGB565/ARGB8888 | RGB565/ARGB8888/YUY2/H.264 |
| [Capture format] | [RGB565/ARGB8888] | [RGB565/ARGB8888] |
| Image resolution | 640x480, 60fps/30fps/15fps | 640x480, 60fps/30fps |
| /frame rate | 1280x720, 60fps/30fps/15fps 1920x1080, 30fps/15fps 2592x1944, 15fps |
1280x720, 60fps/30fps 1920x1080, 30fps 1600x1200, 30fps 2560x1440, 20fps 3264x2448, 10fps [YUY2] 640x480, 30fps 1280x720, 10fps 1920x1080, 5fps 1600x1200, 5fps 2560x1440, 2fps 3264x2448, 1fps [H.264] 640x480, 60fps/30fps 1280x720, 60fps/30fps 1920x1080, 30fps 1600x1200, 30fps 2560x1440, 30fps 3264x2448, 30fps |
| Exposure compensation mode | auto/manual | auto/manual |
| Manual exposure compensation step | -5 ~ +5 | -7 ~ +5 |
| Auto focus mode | off | auto/manual |
| Manual focus | - | +30 ~ +3000 [mm] |
| Sharpness | 0 ~ +128 | - |
| Brightness | -127 ~ +127 | 0 ~ +255 |
| Gain | 0 ~ +255 | +1024 ~ +16383 |
| White ballance | auto /cloudy_daylight(6000K)/daylight(5500K) /fluorescent(4200K)/incandescent(3200K) /twilight(3500K) |
auto /cloudy_daylight(6000K)/daylight(5500K) /fluorescent(4200K)/incandescent(3200K) /twilight(3500K) |
| Power line frequency | 50Hz/60Hz | 50Hz/60Hz/Disable |
| Camera indicator mode | auto | auto/on/off |
3.5. Windows audio control
Moverio can connect a CTIA-compliant earphone/microphone for use in listening to sound sources and voice calls.To control audio in Windows desktop apps, use Core Audio APIs (Link ), which is the standard audio control API of Windows. With this API, you can perform earphone output of sound source, microphone input of voice, various parameter settings of earphone/microphone, etc.
Earphone output of sound source
With Moverio, you can listen to the sound source from the connected earphones using Core Audio APIs. Check the site below for more information.
https://docs.microsoft.com/en-us/windows/desktop/coreaudio/rendersharedeventdriven
Microphone input for voice
With Moverio, you can input audio from a microphone connected using Core Audio APIs. Check the site below for more information.
https://docs.microsoft.com/en-us/windows/desktop/coreaudio/capturesharedeventdriven
Parameter settings
Moverio allows you to set various parameters for earphones and microphones that are connected using Core Audio APIs. Check the site below for more information.
https://docs.microsoft.com/en-us/windows/desktop/CoreAudio/programming-guide
Mute setting
With Moverio, it is possible to temporarily stop (mute) earphone output and microphone input using Core Audio APIs. Check the site below for more information.
https://docs.microsoft.com/en-us/windows/desktop/api/audiopolicy/nf-audiopolicy-iaudiosessionevents-onsimplevolumechanged
3.6. Windows device control
Moverio can detect important system state changes such as USB connection/disconnection with the host device, display start on the display, and device temperature abnormality.In addition, Moverio has device-specific information that can be used. By monitoring changes in the system state, applications can detect when the device is hot and notify the user. By using the device-specific information, you can build and implement a device authentication mechanism that allows only a specific moverio to operate in the application.
Refer to Windows command list.
Moverio model discrimination
| USB Property | BT-35E/30E | BT-30C | BT-40 | BT-45C |
|---|---|---|---|---|
| Vendor ID | VID_0483 | VID_04B8 | VID_04B8 | VID_04B8 |
| Product ID | PID_5750 | PID_0C0C | PID_0D12 | PID_0C0E |
To obtain USB CDC information of Moverio connected to Windows device, use ManagementClass class of .NET API. Specify "Win32_SerialPort" when creating an instance of this class, get the information of "PNPDeviceID" for each port, and determine the model by comparing with the above table.
ManagementClass mcW32SerPort = new ManagementClass("Win32_SerialPort");
foreach (ManagementObject port in mcW32SerPort.GetInstances()) {
    string pnpDeviceId = (string)port.GetPropertyValue("PNPDeviceID");
    if (pnpDeviceId.Contains("VID_0483") && pnpDeviceId.Contains("PID_5750")) {
        Console.WriteLine("BT-35E/30E detected.");
    }
    else if (pnpDeviceId.Contains("VID_04B8") && pnpDeviceId.Contains("PID_0C0C")) {
        Console.WriteLine("BT-30C detected.");
    }
    else if (pnpDeviceId.Contains("VID_04B8") && pnpDeviceId.Contains("PID_0D12")) {
            Console.WriteLine("BT-40 detected.");
    }
    else if (pnpDeviceId.Contains("VID_04B8") && pnpDeviceId.Contains("PID_0C0E")) {
        Console.WriteLine("BT-45C detected.");
    }
    else {
        Console.WriteLine("Unknown device");
    }
}
Check the detailed information of ManagementClass class on the following site.
https://docs.microsoft.com/en-us/dotnet/api/system.management.managementclass?view=dotnet-plat-ext-3.1
Monitor system state changes
With Windows, you can monitor changes in important system status of Moverio, such as the start of display, temperature abnormalities of various devices, etc. By monitoring changes in the system state, applications can detect when the device is hot and notify the user.
To monitor changes in the system status, use the Windows standard COM port access API System.IO.Ports.SerialPort and execute the command "getsystemstat" (get system status).For how to use System.IO.Ports.SerialPort, refer to the document of SerialPort class (Link ) of Microsoft Corporation.
The command return value is shown in the table below.
| Retuen value | Discription |
|---|---|
| 0 | Power off |
| 1 | In a process of initialing the Moverio system |
| 2 | There is no video output from the host device |
| 3 | During image display |
| 4 | Display off |
| 5 | In recovery process *In the automatic recovery function when the display goes out due to static electricity |
Acquisition of device-specific information
Moverio can use the headset serial number information. By using device-specific information, it is possible to introduce a device authentication mechanism that allows only a specific moverio to operate in an application.
To obtain device-specific information, use System.IO.Ports.SerialPort, which is a Windows standard COM port access API, and execute the command "gethserial" (get headset serial number).For how to use System.IO.Ports.SerialPort, refer to the document of SerialPort class (Link ) of Microsoft Corporation.

