Moverio Controller Function SDK
Developer's Guide for Android
2. Developing Android Apps
2.1. Android application software development procedure
This section describes required procedure for the application development of the Moverio controller.
2.1.1. Install Android SDK
The description explains how to install Android SDK using Windows 10 PC as an example.
Download Android Studio
Android Studio will be downloaded from following Android developer's site.
https://developer.android.com/studio/
Install Android Studio
Follow an installer instruction and install Android Studio on your PC.
The later explanation is based on the SDK is installed in the following folder
C:\Users\<user name>\AppData\Local\Android\Sdk
Android Studio proxy settings
When developing an application in a network environment that requires proxy settings, set the Android Studio proxy settings. Please check the detailed procedure on the site below.
https://developer.android.com/studio/intro/studio-config#gradle-plugin
If you do not know the proxy settings, ask your network administrator how to connect to the external network using the proxy.
Acquiring/updating tools with Android SDK Manager
Use the Android SDK Manager for the tools required for application development. Please check the detailed procedure on the site below.
https://developer.android.com/studio/intro/update#sdk-manager
2.1.2. Connect with PC
Use the ADB connection confirmation command to check if the computer and host device are connected.
Start a command prompt and run;
"cd C:\Users\<user name>\AppData\Local\Android\sdk\platform-tools"
*It is convenient to set the above path as an environment variable.
If you execute "adb devices" and the device name is displayed in the list, ADB connection is established.

If it is not displayed, reconnect the host device with USB and execute "adb devices" again.
2.1.3. Embed the Moverio Controller Function SDK
Moverio Controller Function SDK has dedicated API for controlling the Moverio controller. Describe the method for using dedicated API.
Following description is based on using Android Studio.
Display the Project View of Android Studio and create a "libs" folder from [File]-[New]-[Directory].
After C:¥Users¥<user name>¥AndroidStudioProjects¥<application name>¥app¥libs is created.
Put MoverioControllerFunctionSDK_1.0.0.aar there.
Then define your application's minimum API level at 28 and add MoverioControllerFunctionSDK_1.0.0.aar to your application's dependencies.
apply plugin: 'com.android.application'
android {
:
// Add API level 28
minSdkVersion 28
:
}
dependencies {
:
// Add Moverio Controller Function SDK.aar
implementation files('libs/MoverioControllerFunctionSDK_1.0.0.aar')
:
:
}
Press the Sync Project with Gradle Files button at the top of Android Studio to reflect Gradle changes to the project.
2.1.4. Debug the application via network
When developing an application for a headset model (USB connection type Moverio headset), confirm the application behavior in the state of connecting Moverio headset and the Moverio controller via USB. However, the PC and the Moverio controller are not connected by USB, so wired debugging cannot be performed at this time.
This section describes how to develop and debug application software for headset models and the Moverio controller that are connected via USB by connecting to the Moverio controller via a network. Please check the following sites as well.
https://developer.android.com/studio/command-line/adb#wireless
- Connect your computer and the Moverio controller to the same network.
- Connect your computer and the Moverio controller via USB.
*Hereafter, it will be described on the assumption that there is only the Moverio controller connected to the computer. - Execute the following command on the personal computer to enable adb connection to the Moverio controller via the network.
# adb tcpip 5555 - Terminate the USB connection between your computer and the Moverio controller.
- Confirm the IP address of the Moverio controller.
- Execute the following command on the personal computer to connect adb to the Moverio controller via the network.
# adb connect ip_address (e.g. adb connect 192.168.1.10#5555) - Execute the following command on the personal computer and confirm that the Moverio controller is connected to the personal computer by adb. Make sure the device you just connected is listed.
If not connected (not listed), check the following:- Are your computer and the Moverio controller connected to the same network?
- Repeat the procedure from step 3 several times
- Is the IP address entered in 6. correct?
- Install the application on the Moverio controller and check the application operation using Android Studio.
2.2. Description of Moverio Controller Function SDK's dedicated API
2.2.1 Key operation lock

Firstly, please import com.epson.moverio.btcontrol.BtCustomKey such as below.
import com.epson.moverio.btcontrol.BtCustomKey;Next, please create an instance of BtCustomKey class and specify the key constants in the table below in the first argument of the setKeyEnable() method, and specify a boolean type lock (false) and unlock (true) in the second argument and call it.
| Constants | Description |
|---|---|
| BtCustomKey.VOLUME_UP | Volume up key |
| BtCustomKey.VOLUME_DOWN | Volume down key |
| BtCustomKey.TRIGGER | Function key |
| BtCustomKey.HOME | Home key |
| BtCustomKey.BACK | Back key |
| BtCustomKey.APP_SWITCH | History key |
| BtCustomKey.POWER | Power button |
| BtCustomKey.ALLKEY | Used to specify all physical keys |
public class UIControlActivity extends Activity {
    private BtCustomKey mBtCustomKey = null;
    private Button mButton_powerKeyLock = null;

    @Override
    public final void onCreate(Bundle savedInstanceState) {
        super.onCreate(savedInstanceState);
        mBtCustomKey = new BtCustomKey(this);
        mButton_powerKeyLock = (Button) findViewById(R.id.button_powerKeyLock);
        mButton_powerKeyLock.setOnClickListener(new View.OnClickListener() {

            @Override
            public void onClick(View view) {
                mBtCustomKey.setKeyEnable(BtCustomKey.POWER, false); /* Disable power key. */
            }
        });
    }
    :
    :
}
2.2.2 Key code customization
This API can change the key code assigned to the physical key of the Moverio controller. However, it is impossible to change the key code of the power button.
Firstly, please import com.epson.moverio.btcontrol.BtCustomKey such as below.
import com.epson.moverio.btcontrol.BtCustomKey;Next, please create an instance of the BtCustomKey class and specify the target physical key in the table below as the first argument of the setKeyAssign() method, and specify the key code as the second argument.
| Target Physical Key | Key Code |
|---|---|
| BtCustomKey.VOLUME_UP | KeyEvent.KEYCODE_VOLUME_UP |
| BtCustomKey.VOLUME_DOWN | KeyEvent.KEYCODE_VOLUME_DOW |
| BtCustomKey.TRIGGER | KeyEvent.KEYCODE_FUNCTION |
| BtCustomKey.HOME | KeyEvent.KEYCODE_HOME |
| BtCustomKey.BACK | KeyEvent.KEYCODE_BACK |
| BtCustomKey.APP_SWITCH | KeyEvent.KEYCODE_APP_SWITCH KeyEvent.KEYCODE_F1 |
| KeyEvent.KEYCODE_F2 | |
| KeyEvent.KEYCODE_F3 | |
| KeyEvent.KEYCODE_F4 |
public class UIControlActivity extends Activity {
    private BtCustomKey mBtCustomKey = null;
    private Button mButton_appSwitch2Home = null;

    @Override public final void onCreate(Bundle savedInstanceState) {
        super.onCreate(savedInstanceState);
        mBtCustomKey = new BtCustomKey(this);
        mButton_appSwitch2Home = (Button) findViewById(R.id.button_appSwitch2Home);
        mButton_appSwitch2Home.setOnClickListener(new View.OnClickListener() {

            @Override public void onClick(View view) {
                mBtCustomKey.setKeyAssign(BtCustomKey.APP_SWITCH, KeyEvent.KEYCODE_HOME);
            }
        });
    }
    :
    :
}
2.2.3 Initialize key status
This API can initialize key status that are changed by "Key operation lock" and "Key code customization".
Please execute resetToDefault() on instance that was generated for "Key operation lock" for "Key code customization".
mBtCustomKey.resetToDefault();Note : Initializing key status by key operations: You can initialize the key status by holding down the Function key, Home key, and Volume Up key at the same time for three seconds. Use this to force the key status to initialize when an application closes abnormally while the key status has been changed.
2.2.4 LED indicator of the Moverio controller
This API can control LED indicator of the Moverio controller (Lighted mode/Not lighted mode) .
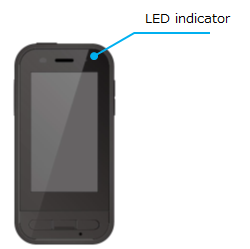
Firstly, please import com.epson.moverio.btcontrol.BtControllerLedMode.
import com.epson.moverio.btcontrol.BtControllerLedMode;Next, please create an instance of BtControllerLedMode class and specify constants in the table below as the first argument of the setControllerLedMode() method.
| Constants | Description |
|---|---|
| BtControllerLedMode.MODE_OFF | Not lighted mode |
| BtControllerLedMode.LED_MODE_NORMAL | Lighted mode |
public class UIControlActivity extends Activity {
    private BtControllerLedMode mBtLed = null;
    private Button mButton_ledOff = null;

    @Override public final void onCreate(Bundle savedInstanceState) {
        super.onCreate(savedInstanceState);
        mBtLed = new BtControllerLedMode (this);
        mButton_ledOff = (Button) findViewById(R.id.button_appSwitch2Home);
        mButton_ledOff.setOnClickListener(new View.OnClickListener() {
            @Override public void onClick(View view) {
            mBtLed.setControllerLedMode(BtControllerLedMode.MODE_OFF);
            }
        });
    }
    :
    :
}
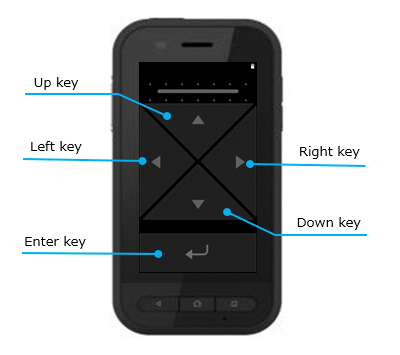
2.2.5 Switching UI mode of the Moverio controller
The Moverio controller has Mirror mode (Same picture is shown between headset and controller), Trackpad mode(Usable trackpad on controller screen) and Assist mode (Usable arrow key on controller screen).
This API can switch these modes.
Firstly, please import com.epson.moverio.btcontrol.UIControl.
import com.epson.moverio.btcontrol.UIControl;Next, please create an instance of UIControl class and specify constants in the table below as the first argument of the setUiMode() method.
| Constants | Description |
|---|---|
| UIControl.UI_MODE_MIRROR | Switch to Mirror mode |
| UIControl.UI_MODE_TRACK | Switch to Trackpad mode |
| UIControl.UI_MODE_ASSIST | Switch to Assist mode |
public class UIControlActivity extends Activity {
    private UIControl mUiMode = null;
    private Button mButton_modeTrack = null;

    @Override public final void onCreate(Bundle savedInstanceState) {
        super.onCreate(savedInstanceState);
        mUiMode = new UIControl (this);
        mButton_modeTrack = (Button) findViewById(R.id.button_appSwitch2Home);
        mButton_modeTrack.setOnClickListener(new View.OnClickListener() {
            @Override public void onClick(View view) {
                mUiMode.setUiMode(UIControl. UI_MODE_TRACK);
            }
        });
    }
    :
    :
}
Note : When the modes are switched by this AP, the application is closed automatically to application screen reconstruction. After completed to switch mode, the application screen (Activity) before closed is shown again automatically.
Assist mode is added from version 2.1.00. This mode is usable arrow key on controller screen.
When mode is switched to Assist mode, arrow key and enter key are shown on controller screen. Application can get following key events by dispatchKeyEvent() of Android API depending on key operation.
| Key name | Key event |
|---|---|
| Up key | KeyEvent.KEYCODE_DPAD_UP |
| Down key | KeyEvent.KEYCODE_DPAD_DOWN |
| Left key | KeyEvent.KEYCODE_DPAD_LEFT |
| Right key | KeyEvent.KEYCODE_DPAD_RIGHT |
| Enter key | KeyEvent.KEYCODE_DPAD_CENTER |
@Override
public boolean dispatchKeyEvent(KeyEvent e) {
    if(e.getKeyCode() == KeyEvent.KEYCODE_DPAD_UP && e.getAction() == KeyEvent.ACTION_DOWN) {
         // Press Up key
    } else if(e.getKeyCode() == KeyEvent.KEYCODE_DPAD_DOWN && e.getAction() == KeyEvent.ACTION_DOWN) {
         // Press Down key
    } else if(e.getKeyCode() == KeyEvent.KEYCODE_DPAD_LEFT && e.getAction() == KeyEvent.ACTION_DOWN) {
         // Press Left key
    } else if(e.getKeyCode() == KeyEvent.KEYCODE_DPAD_RIGHT && e.getAction() == KeyEvent.ACTION_DOWN) {
        // Press Right key
    } else if(e.getKeyCode() == KeyEvent.KEYCODE_DPAD_CENTER && e.getAction() == KeyEvent.ACTION_DOWN) {
       // Press Enter key
    }

    return true;
}
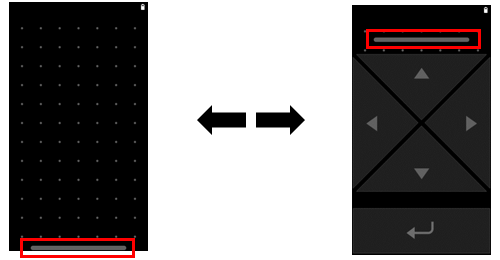
If the bar of upper part of controller screen is pulled down, Assist mode is finished and mode transfer to Trackpad mode.

If the toggle button of "Settings->Accessibility->Arrow Key" is ON, Assist mode is usable without setUiMode(). (Default setting is OFF)
If above setting is on, the bar is shown on lower part of controller screen. If this bar is pulled up on Trackpad mode, mode transfer to Assist mode. If this bar is pulled down on Assist mode, mode transfer to Trackpad mode.
Note : Assist mode is the feature for new application development. Please note that existing applications of including pre-install applications usually don't not correspond screen operation (can't operate screen) by arrow key and enter key.
2.2.6 Switch Key Lock feature
This API can switch enable/disable of the Key Lock feature that executed at the time of holding down function key.
Firstly, please import com.epson.moverio.btcontrol.KeyLock.
import com.epson.moverio.btcontrol.KeyLock;Next, please create an instance of KeyLock class and specify constants in the table below as the first argument of the setKeyLock() method.
| Constants | Description |
|---|---|
| KeyLock.KEY_LOCK_ENABLE | Enable Key Lock feature |
| KeyLock.KEY_LOCK_DISABLE | Disable Key Lock feature |
public class UIControlActivity extends Activity {
    private KeyLock mKeyLock = null;
    private Button mButton_keyLock = null;

    @Override public final void onCreate(Bundle savedInstanceState) {
        super.onCreate(savedInstanceState);
        mKeyLock = new KeyLock (this);
        mButton_keyLock = (Button) findViewById(R.id.button_keyLock);
        mButton_keyLock.setOnClickListener(new View.OnClickListener() {
            @Override public void onClick(View view) {
                mKeyLock.setKeyLock(KeyLock.KEY_LOCK_ENABLE);
                Handler handler = new Handler(getMainLooper());
                handler.postDelayed(new Runnable(){
                public void run() {
                        if (keyLock.getKeyLock() == KeyLock.KEY_LOCK_ENABLE) {
                          keyLock.setKeyLock(KeyLock.KEY_LOCK_DISABLE);
                        }
                    }
                }, 10000);
            }
        });
    }
    :
    :
}
*When Key Lock feature is enabled, all operations of the Moverio controller (Physical key operation, Touch operation) are disabled. If Key Lock feature doesn't need to enable, please disable this feature promptly. Following code enable Key Lock feature and will be disabled automatically after 10 second. In addition, Key Lock feature is disabled automatically when the Moverio controller enter to sleep mode.
2.3. Camera Control by Android CameraAPI
BT-35E and BT-45C have front facing headset camera. The Moverio controller can get camera data (picture, video) by Android Camera API or Moverio SDK. In addition, the camera data can be applied to various uses (e.g. marker recognition, etc.).
This section describes how to control BT-35E camera and BT-45C camera with the Moverio controller.
*Note : This document is for OS version 2.1.00 of the Moverio controller.
2.3.1 BT-45C/BT-35E camera control using BO-IC400
The Moverio controller can control BT-45C/BT-35E camera using Android CameraAPI or Moverio Basic Function SDK. Please refer to developer guide of Moverio Basic Function SDK for way of controlling camera by SDK. However, camera control by Android CameraAPI and Moverio Basic Function SDK cannot use at the same time. After controlling the camera with the Moverio Basic Function SDK, Android CameraAPI cannot detect the camera. When using Android CameraAPI after using camera control by Moverio Basic Function SDK, please reconnect BT-45C / BT-35E.
There are CameraAPI1 and CameraAPI2 available for Android CameraAPI. Please refer to following information for the usages of each API.
Android CameraAPI1(android.hardware.Camera)
https://developer.android.com/training/camera
*Note:CameraAPI1 is deprecated
Android CameraAPI2(android.hardware.camera2)
https://developer.android.com/training/camera2
https://medium.com/google-developers/detecting-camera-features-with-camera2-61675bb7d1bf
Sample source code of Android Camera API2
The following information is sample code for a camera application using CameraAPI2. Build and run app to the Moverio controller and launch the application with BT-45C/BT-35E connected, BT-45C/BT-35E camera can now be used. Please refer to this for implementing application.
https://github.com/googlearchive/android-Camera2Basic
2.3.2 Android API versus Moverio Basic Function SDK
It is possible to control the BT-45C/BT-35E camera in the Moverio controller by Android CameraAPI2. However, it is impossible to change some settings from Android CameraAPI2. Please use Moverio Basic Function SDK if want to change these settings. The spec of BT-45C/BT-35E camera and controllability of the settings by each API / SDK are described in "The correspondence table of setting controllability by Android CameraAPI2 / Moverio SDK".
The correspondence table of setting controllability by Android CameraAPI2 / Moverio Basic Function SDK
| Settings | BT-35E | BT-45C | Android CameraAPI | Moverio Basic Function SDK |
|---|---|---|---|---|
| Resolution | 640x480 | 640x480 | ||
| 1280x720 | 1280x720 | |||
| 1600x1200 | ||||
| 1920x1080 | 1920x1080 | |||
| 2560x1440 | ||||
| 2592x1944 | ||||
| 3264x2448 | ||||
| Exposure compensation | auto/manual | auto/manual | auto only | |
| The step of manual exposure compensation |
-5 ~ +5 | -7 ~ +5 | ||
| Focus mode | Off (Pan) | auto/manual | auto only | |
| Manual focus | +50 ~ +3000[mm] | |||
| Sharpness | 0 ~ +128 | |||
| Brightness | -127 ~ +127 | 0 ~ +255 | ||
| Gain | 0 ~ +255 | +1024 ~ +16383 | ||
| White balance | auto/cloudy_daylight(6000K)/ daylght(5500K)/fluorescent(4200K)/ incandescent(3200K)/twilight(3500K) |
auto/cloudy_daylight(6000K)/ daylight(5500K)/fluorescent(4200K)/ incandescent(3200K)/twilight(3500K) |
auto only | |
| Power frequency | 50Hz/60Hz | 50Hz/60Hz/Disable | ||
| Indicator mode | auto | Auto/on/off |
2.3.3 BT-45C/BT-35E camera control specification for the Moverio controller using Android CameraAPI
The Moverio controller has the camera (Back camera). Normally, Android CameraAPI user this camera. On the other hand, the Moverio controller has the feature that Android CameraAPI give priority to use BT-45C/BT-35E camera (hereinafter called "headset camera"). This feature is called "the feature of priority using headset camera". Please refer to "Camera control specification for the Moverio controller using Android CameraAPI" for this feature of software specification. In addition, the setting of "Camera Custom State" is added from OS version 2.1.00 in order that the Moverio controller select to priority use headset camera or not.
The feature of priority using headset camera is activated under the following conditions at OS version 2.1.00.
- Camera Custom State is ON
- Headset camera (BT-45C or BT-35E) is connected to the Moverio controller
- Current mode of the Moverio controller is Trackpad mode or Assist mode
The Moverio controller also had the feature of priority using headset camera on OS version 2.0.00. However, activate conditions of the feature of priority using headset camera are different in part with OS version 2.1.00. Please note it. "Active conditions of the feature of priority using headset camera" is described for the details. "-" of this table mean that standard behavior of Android CameraAPI.
Activate condition of the feature of priority using headset camera
| OS version | Version2.0.00 | Version2.1.00 | |||||
|---|---|---|---|---|---|---|---|
| Mode of the Moverio controller | Other conditions | Camera Custom State does not exist | Camera Custom State is ON | Camera Custom State is OFF | |||
| Connect H camera* |
Disconnect H camera |
Connect H camera |
Disconnect H camera |
Connect H camera |
Disconnect H camera |
||
| Mirror mode | - | - | - | - | - | ||
| Trackpad mode | - | - | - | - | |||
| Assist mode | |||||||
Camera Custom State is OFF on default. When BT-45C or BT-35E is connected at first time, this setting become ON automatically. If you want to change this setting, please operate the toggle button of "Setting -> Accessibility-> Camera Custom State". This setting will not become ON automatically if when BT-45C or BT-35E is connected from the second time.
2.3.4 Camera control specification for the Moverio controller using Android CameraAPI
When the feature of priority using headset camera is activated, the specification of some Android CameraAPI of the Moverio controller are different with standard Android CameraAPI. This topic explains about this specification on CameraAPI2.
The code snippet for getting camera characteristics
CameraManager manager = (CameraManager)getSystemService(CAMERA_SERVICE);
try {
    for (String cameraId : manager.getCameraIdList()) {
        CameraCharacteristics chars = manager.getCameraCharacteristics(cameraId);
        // Do something with the characteristics
    } catch (CameraAccessException e) {
        e.printStackTrace();
    }
"The code snippet for getting camera characteristics" specify the cameraId and get camera characteristics. The Moverio controller has two USB port (Bottom port, Side port) and it is possible to control headset camera and USB camera by connecting these. However, headset camera is supported on Bottom port only.
When headset camera is connected to Bottom port and the feature of priority using headset camera is activated, the cameraId is assigned such as "The cameraId at connecting headset camera".
The cameraId at connecting headset camera
| Camera API | The Moverio controller Back Camera | Bottom port | Side port * |
|---|---|---|---|
| Camera API1 | 1 | 0 | 2 |
| Camera API2 | /dev/video3 | 0 | /dev/video4 |
* In case of connecting USB camera to Side port
The Moverio controller gets camera characteristics from CameraCharacteristics and can select intended camera.
The code snippet for getting camera lends direction
CameraCharacteristics chars = manager.getCameraCharacteristics(cameraId);
Integer facing = chars.get(CameraCharacteristics.LENS_FACING);
"The code snippet for getting camera lens facing" specify cameraId and get the lens facing from camera characteristics.
When headset camera is connected to Bottom port and the feature of priority using headset camera is activated, the lens facing is assigned such as "The lens facing at connecting headset camera".
The lens facing at connecting headset camera
| Camera API | The Moverio controller Back Camera | Bottom port | Side port * |
|---|---|---|---|
| Camera API1 | FRONT | BACK | FRONT |
| Camera API2 | EXTERNAL | BACK | EXTERNAL |
* In case of connecting USB camera to Side port
"The code snippet for using headset camera" is that code snippet in case of using headset camera.
The code snippet for using headset camera
CameraManager manager = (CameraManager)getSystemService(CAMERA_SERVICE);
try {
    for (String cameraId : manager.getCameraIdList()) {
        CameraCharacteristics chars = manager.getCameraCharacteristics(cameraId);
        Integer facing = chars.get(CameraCharacteristics.LENS_FACING);
        if (facing != null && facing == CameraCharacteristics.LENS_FACING_BACK) {
            // Open BT-45C/BT-35E camera (Please refer to upper link)
        }
    } catch (CameraAccessException e) {
        e.printStackTrace();
    }
The information of cameraId is used for not only opening camera but setTorchMode API that uses camera flash light. The table "The cameraId at connecting headset camera" is applied for setTorchMode too. When want to use back flash light of the Moverio controller with connecting headset camera and the feature of priority using headset camera is activated, it is necessary to specify "/dev/video3" as cameraId.
- About using USB camera
When USB camera is connected to USB port (Bottom or Side), the cameraId is assigned such as "The cameraId at connecting USB camera" regardless of status of the feature of priority using headset camera.
The cameraId at connecting USB camera
| Camera API | The Moverio controller Back Camera | Bottom Port * | Side Port * |
|---|---|---|---|
| Camera API1 | 0 | 1 or 2 | 1 or 2 |
| Camera API2 | 0 | /dev/video3 or 4 | /dev/video3 or 4 |
* cameraId can be assigned a lower number Id from the first recognized device
The lens facing is assigned such as "The lens facing at connecting USB camera".
The lens facing at connecting USB camera
| Camera API | The Moverio controller Back Camera | Bottom Port | Side Port |
|---|---|---|---|
| Camera API1 | BACK | FRONT | FRONT |
| Camera API2 | BACK | EXTERNAL | EXTERNAL |
If the Moverio controller use USB camera, please specify the parameters of "The cameraId at connecting USB camera" and "The lens facing at connecting USB camera" to the source code of "The code snippet for using BT-45C/BT-35E camera".
- About the screen rotation process
At Android CameraAPI2 sample source code, the screen rotation process depending on the Moverio controller rotate state is executed in order to do appropriate camera preview.
However, when the same process is executed using headset camera, the Moverio controller rotate state and headset rotate state don't synchronize. As a result, the mismatch of camera preview is occurred. Therefore, when the Moverio controller use headset camera, recommend to not include the screen rotation process such as "The source code of not including screen rotation process" (Comment out "matrix.postRoatate()").
The source code of not including screen rotation process
if (Surface.ROTATION_90 == rotation || Surface.ROTATION_270 == rotation) {
    bufferRect.offset(centerX - bufferRect.centerX(), centerY - bufferRect.centerY());
    matrix.setRectToRect(viewRect, bufferRect, Matrix.ScaleToFit.FILL);
    float scale = Math.max((float) viewHeight / mPreviewSize.getHeight(), (float) viewWidth / mPreviewSize.getWidth());
    matrix.postScale(scale, scale, centerX, centerY);
    // matrix.postRotate(90 * (rotation - 2), centerX, centerY);
}
In addition, the return values of AndroidAPI regarding screen rotation are fixed value on Trackpad mode like "The AndroidAPI regarding screen rotation".
The AndroidAPI regarding screen rotation
| Android API | Return value |
|---|---|
| Display#getRotation() | ROTATION_0 |
| Configuration#orientation | ORIENTATION_LANDSCAPE |
- About the aspect ratio of preview
The mounting angle differs between the camera mounted on the Moverio controller and headset camera. Please refer to the table below for details.
The return value of CameraCharacteristics.get(CameraCharacteristics.SENSOR_ORIENTATION)
| Type of Camera | Return value |
|---|---|
| The Moverio controller Back Camera | 90 |
| BT-45C/BT-35E Camera | 0 |
herefore, if use headset camera and preview the image assuming 90-degree mounting angle, the preview screen may be distorted. For example, a square object will appear as a rectangle. It is recommended that pay attention to the mounting angle and preview the image appropriately for the resolution of the acquired image.
The Android CameraAPI2 sample source code assumes a 90-degree mounting angle for previewing. With the following modification such as "The code of changing appropriate aspect ratio", headset camera can preview with the proper aspect ratio.
The code of changing appropriate aspect ratio
if(mSensorOrientation != 0){
    // When the mounting angle is not 0-degree, it is dedicated controller back camera, so it should be the same as the original source code.
    if (orientation == Configuration.ORIENTATION_LANDSCAPE) {
        mTextureView.setAspectRatio(mPreviewSize.getWidth(),mPreviewSize.getHeight());
    } else {
        mTextureView.setAspectRatio(
        mPreviewSize.getHeight(), mPreviewSize.getWidth());
    }
} else {
        // When the mounting angle is 0-degree, it is determined to be BT-35E camera (USB camera).
        //BT-35E camera doesn't rotate regardless of the device state, so the aspect ratio is always assumed to be horizontal preview.
        mTextureView.setAspectRatio(
        mPreviewSize.getWidth(), mPreviewSize.getHeight());
}
if(mSensorOrientation !=0) {
    // For BT-35E camera, the following process is not necessary because BT-35E camera doesn't rotate regardless of the device state.
    if (Surface.ROTATION_90 == rotation || Surface.ROTATION_270 == rotation) {
        bufferRect.offset(centerX - bufferRect.centerX(), centerY - bufferRect.centerY());
        matrix.setRectToRect(viewRect, bufferRect, Matrix.ScaleToFit.FILL);
        float scale = Math.max((float) viewHeight / mPreviewSize.getHeight(), (float) viewWidth / mPreviewSize.getWidth());
        matrix.postScale(scale, scale, centerX, centerY);
        matrix.postRotate(90 * (rotation - 2), centerX, centerY);
    } else if (Surface.ROTATION_180 == rotation) {
        matrix.postRotate(180, centerX, centerY);
    }
}
2.4. Sensor control by Android CameraAPI
BT-45C, BT-40 and BT-35E have various sensors (hereinafter called "headset sensor") in the headset that detect movement, direction, and ambient illuminance. By using these sensor data, it is possible to guess the movement of the wearer's head and the surrounding brightness.
This section describes how to control headset sensor with the Moverio controller.
*Note : This document is for OS version 2.1.00 of the Moverio controller.
2.4.1 Headset sensor control using the Moverio controller
The Moverio controller can control headset sensor using Android Sensor API or Moverio Basic Function SDK. Please refer to developer guide of Moverio Basic Function SDK for way of controlling headset sensor by SDK. However, headset sensor control by Android Sensor API and Moverio Basic Function SDK cannot use at the same time. After controlling headset sensor with the Moverio Basic Function SDK, Android Sensor API cannot detect headset sensor. When using Android Sensor API after using headset sensor control by Moverio Basic Function SDK, please reconnect headset sensor.
Please refer to following information for specification of Android Sensor API.
https://developer.android.com/reference/android/hardware/Sensor
2.4.2 About the feature of priority using headset sensor
The Moverio controller has same type sensor with headset sensor. Normally, Android Sensor API user this sensor. On the other hand, the Moverio controller has the feature that Android Sensor API give priority to use headset sensor. This feature is called "the feature of priority using headset sensor". Please refer to "Sensor control specification for the Moverio controller using Android Sensor API" for software specification of this feature. In addition, the Moverio controller has "Sensor Custom State" in order that the Moverio controller select to priority use headset sensor or not.
The feature of priority using headset sensor is activated under the following conditions at OS version 2.1.00.
- Sensor Custom State is ON
- Headset sensor (BT-45C, BT-40 or BT-35E) is connected to the Moverio controller
- Current mode of the Moverio controller is Trackpad mode or Assist mode
"Active conditions of the feature of priority using headset sensor" is described for behavior of the feature of priority using headset senso. "-" of this table mean that standard behavior of Android Sensor API.
Active conditions of the feature of priority using headset sensor
| Mode of the Moverio controller | Other condition | Sensor custom state is ON | Sensor custom state is OFF | ||
|---|---|---|---|---|---|
| Connect H sensor* |
Disconnect H sensor |
Connect H sensor |
Disconnect H sensor |
||
| Mirror mode | - | - | - | - | |
| Trackpad mode | - | - | - | ||
| Assist mode | |||||
*H sensor : Headset sensor
Sensor Custom State is OFF on default. When BT-45C, BT-40 or BT-35E is connected at first time, this setting become ON automatically. If you want to change this setting, please operate the toggle button of "Setting -> Accessibility-> Sensor Custom State". This setting will not become ON automatically if when BT-45C, BT-40 or BT-35E is connected from the second time.
2.4.3 Supported sensor types and sensor axis on headset
Headset has various sensors. Supported sensor types (Sensor data are available) are described in "Supported sensor types on headset".
Supported sensor types on headset
| Sensor type | Sensor ID (Hex) | Description | Android standard sensor type | Event frequency | Supported sensor type | |
|---|---|---|---|---|---|---|
| BT-45C BT-40 |
BT-35E | |||||
| TYPE_ACCELEROMETER | 0x00000001 | Measure the acceleration of headset including gravity along the three axes (X, Y, and Z). | 100Hz | |||
| TYPE_MAGNETIC_FIELD | 0x00000002 | Measure the surrounding magnetic field of headset along the three axes (X, Y, and Z). | 100Hz | |||
| TYPE_GYROSCOPE | 0x00000004 | Measure the angular velocity of headset along the three axes (X, Y, and Z). | 100Hz | |||
| TYPE_LIGHT | 0x00000005 | Measure the surrounding ambient light of headset. | 5Hz | |||
| TYPE_GRAVITY | 0x00000009 | Measure the acceleration of gravity of headset along the three axes (X, Y, and Z). | 100Hz | |||
| TYPE_LINEAR_ACCELERATION | 0x0000000a | Measure the acceleration of headset along the three axes (X, Y, and Z) with gravity removed. | 100Hz | |||
| TYPE_ROTATION_VECTOR | 0x0000000b | Measure headset orientation in rotation vectors from 9-axis sensor (Accelerometer, Gyroscope, Magnetic). | 100Hz | |||
| TYPE_MAGNETIC_FIELD_UNCALIBRATED | 0x0000000e | Measure the surrounding uncalibrated magnetic field (Raw data) of headset along the three axes (X, Y, and Z). | 100Hz | |||
| TYPE_GAME_ROTATION_VECTOR | 0x0000000f | Measure headset orientation in rotation vectors from 6-axis sensor (Accelerometer, Gyroscope). | 100Hz | |||
| TYPE_GYROSCOPE_UNCALIBRATED | 0x00000010 | Measure the uncalibrated angular velocity (Raw data) of the headset along the three axes (X, Y, and Z). | 100Hz | |||
| TYPE_STATIONARY_DETECT | 0x0000001d | Detect stationary state of headset. When headset is stationary 1 minute, "1" of data is outputted. | At occurring event | |||
| TYPE_MOTION_DETECT | 0x0000001e | Detect motion state of headset. When headset is moved after detected stationary state of headset, "1" of data is outputted. | At occurring event | |||
| TYPE_ACCELEROMETER_UNCALIBRATED | 0x00000023 | Measure the uncalibrated acceleration (Raw data) of headset including gravity along the three axes (X, Y, and Z) | 100Hz | |||
| TYPE_HEADSET_TAP | 0x00102001 | Detect the stationary state of headset. When headset is tapped twice, "1" of data is outputted. | - | At occurring event | ||
When the feature of priority using headset sensor is activated, application can get headset sensor data by specified any Sensor ID to Android Sensor API.
Sensor types except for TYPE_HEADSET_TAP are Android standard sensor type. Therefore, constant values of Sensor class are available as Sensor ID.
However, TYPE_HEADSET_TAP is not Android standard sensor type. Therefore, please specify Sensor ID of "Supported sensor types on headset" (0x00102001) to Android Sensor API directly.
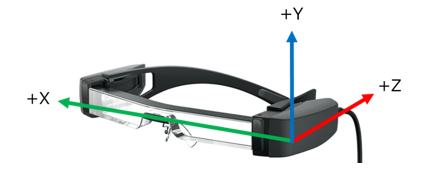
Headset sensor axis is same with Android standard sensor coordinate system. When user wear headset, X axis show right direction and Y axis show upper direction and Z axis show wearer direction.
Headset sensor axis
By the way, please note about below If the feature of priority using headset sensor is activated and you use headset sensor.
- Frequency of outputting headset sensor data are fixed on "Event frequency" of "Supported sensor types on headset". Therefore, if you try to change event frequency at registering sensor, this is not reflected. (e.g., Specify SENSOR_DELAY_FASTEST on registerListener(), etc)
- Each information of sensor property (e.g., name, maximum range ,etc) that can get from Sensor class are not headset sensor. These are controller sensor's one.
- Not supported sensor types on BT-35E (e.g., TYPE_GAME_ROTATION_VECTOR, TYPE_ACCELEROMETER_UNCALIBRATED, etc) are not available (Sensor data aren't outputted) even if specify Sensor ID of Android standard sensor type. If you want to use controller sensor, please refer to "About getting controller sensor data at the time of activated the feature of priority using headset sensor".
2.4.4 About getting controller sensor data at the time of activated the feature of priority using headset sensor
When the feature of priority using headset sensor is activated, sensor types of "Supported sensor types on headset" are not available from controller even if you specify Sensor ID of Android standard sensor type.
If you want to use controller sensor data at this time, please specify Sensor ID of custom sensor type for the Moverio controller to Android Sensor API.
Sensor ID of custom sensor type are described in "Custom sensor type for the Moverio controller". By the way, these sensor types aren't not Android standard sensor type. Therefore, please specify Sensor ID of table to Android Sensor API directly.
Custom sensor type for the Moverio controller
| Custom sensor type | Sensor ID (Hex) | Corresponded Android standard sensor type |
|---|---|---|
| TYPE_CONTROLLER_ACCELEROMETER | 0x00100001 | TYPE_ACCELEROMETER |
| TYPE_CONTROLLER_MAGNETIC_FIELD | 0x00100002 | TYPE_MAGNETIC_FIELD |
| TYPE_CONTROLLER_GYROSCOPE | 0x00100004 | TYPE_GYROSCOPE |
| TYPE_CONTROLLER_LIGHT | 0x00100005 | TYPE_LIGHT |
| TYPE_CONTROLLER_GRAVITY | 0x00100009 | TYPE_GRAVITY |
| TYPE_CONTROLLER_LINEAR_ACCELERATION | 0x0010000a | TYPE_LINEAR_ACCELERATION |
| TYPE_CONTROLLER_ROTATION_VECTOR | 0x0010000b | TYPE_ROTATION_VECTOR |
| TYPE_CONTROLLER_MAGNETIC_FIELD_UNCALIBRATED | 0x0010000e | TYPE_MAGNETIC_FIELD_UNCALIBRATED |
| TYPE_CONTROLLER_GAME_ROTATION_VECTOR | 0x0010000f | TYPE_GAME_ROTATION_VECTOR |
| TYPE_CONTROLLER_GYROSCOPE_UNCALIBRATED | 0x00100010 | TYPE_GYROSCOPE_UNCALIBRATED |
| TYPE_CONTROLLER_STATIONARY_DETECT | 0x0010001d | TYPE_STATIONARY_DETECT |
| TYPE_CONTROLLER_MOTION_DETECT | 0x0010001e | TYPE_MOTION_DETECT |
| TYPE_CONTROLLER_ACCELEROMETER_UNCALIBRATED | 0x00100023 | TYPE_ACCELEROMETER_UNCALIBRATED |
2.4.5 Sensor control specification for the Moverio controller using Android Sensor API
Supported sensor types on the feature of priority using headset sensor are categorized as normal sensor and trigger sensor. Following sensor types are trigger sensor and other sensor types are normal sensor.
- TYPE_STATIONARY_DETECT
- TYPE_MOTION_DETECT
- TYPE_CONTROLLER_STATIONARY_DETECT
- TYPE_CONTROLLER_MOTION_DETECT
Describe about how to use normal sensor and trigger sensor from application using Android Sensor API.
- How to use normal sensor
1. Import module
Import following modules for using normal sensor.
import android.hardware.Sensor;
import android.hardware.SensorManager;
import android.hardware.SensorEvent;
import android.hardware.SensorEventListener;
2. Use EventListener
Implements SensorEventListener to Activity or Service for getting sensor data.
public class SampleActivity extends Activity implements SensorEventListener {
    @Override
    public void onAccuracyChanged(Sensor sensor, int accuracy) {
    }
    @Override
    public void onSensorChanged(SensorEvent event) {
    }
}
3. Register sensor
Get SENSOR_SERVICE from system and register any sensor to SensorEventListener.
By the way, there is no real limit to the number of sensors that can be used at the same time, but we recommend to only register necessary sensors to prevent a decline in performance.
e.g., Register TYPE_ACCELEROMETER and TYPE_CONTROLLER_ACCELEROMETER (Sensor ID : 0x00100001)
SensorManager sm = (SensorManager)getSystemService(SENSOR_SERVICE);
// Register accelerometer
Sensor acc = sm.getDefaultSensor(Sensor.TYPE_ACCELEROMETER);
sm.registerListene(this, acc, SensorManager.SENSOR_DELAY_NORMAL);

// Register controller accelerometer
Sensor cacc = sm.getDefaultSensor(0x00100001);
sm.registerListener(this, cacc, SensorManager.SENSOR_DELAY_NORMAL);
4. Get sensor data
Get sensor data on onSensorChanged().
e.g., Get sensor data of TYPE_ACCELEROMETER and TYPE_CONTROLLER_ACCELEROMETER (Sensor ID : 0x00100001)
@Override
public void onSensorChanged(SensorEvent event) {
    switch(event.sensor.getType()) {
        case Sensor.TYPE_ACCELEROMETER:
            // Get accelerometer event (Show log)
            Log.d("Sample", "x="+event.values[0]+",y="+event.values[1]+",z="+event.values[2]);
            break;
        case 0x00102001:
            // Get controller accelerometer event (Show log)
            Log.d("Sample", "x="+event.values[0]+",y="+event.values[1]+",z="+event.values[2]);
            break;
    }
}
5. Unregister sensor
When application do to stop sensor, unregister it.
e.g., Unregister TYPE_ACCELEROMETER and TYPE_CONTROLLER_ACCELEROMETER
// Unregister accelerometer
sm.unregisterListener(this, acc);
// Unregister controller accelerometer
sm.unregisterListener(this, cacc);
- How to use trigger sensor
1. Import module
Import following modules for using trigger sensor.
import android.hardware.Sensor;
import android.hardware.SensorManager;
import android.hardware.TriggerEvent;
import android.hardware.TriggerEventListener;
2. Use EventListener
Create any class in Activity or Service and extends TriggerEventLisnter to this class.
public class SampleActivity extends Activity {
    public class TriggerListener extends TriggerEventListener {
        @Override
        public void onTrigger(TriggerEvent e) {
        }
    }
}
3. Request sensor
Get SENSOR_SERVICE from system and request any sensor to SensorEventListener.
e.g., Request TYPE_STATIONARY_DETECT
SensorManager sm = (SensorManager)getSystemService(SENSOR_SERVICE);
TriggerListener triggerEventListener = new TriggerListener();

// Register stationary detect
sta = mSensorManager.getDefaultSensor(Sensor.TYPE_STATIONARY_DETECT);
sm.requestTriggerSensor(triggerEventListener, sta);
4. Get sensor data
Sensor data (sensor event) is raised on onTrigger(). If sensor event is raised, this sensor type's request is released. If you want to use sensor ID, please request sensor again.
e.g., Get sensor data of TYPE_STATIONARY_DETECT
public class TriggerListener extends TriggerEventListener {
    @Override
    public void onTrigger(TriggerEvent e) {
        switch(e.sensor.getType()) {
            case Sensor.TYPE_STATIONARY_DETECT:
                mTextView_staData.setText(String.format("%f", e.values[0]));
                Log.d("Sample", "Get stationary event : " + e.values[0]);
                break;
        }
    }
}
2.4.6 Sample code
This sample code is that application use TYPE_ACCELEROMETER, TYPE_CONTROLLER_ACCELEROMETER, TYPE_STATIONARY_DETECT, TYPE_HEADSET_TAP.
- Activity (SampleActivity.java)
Package ***;

import android.app.Activity;
import android.content.pm.ActivityInfo;
import android.os.Bundle;
import android.view.WindowManager;
import android.widget.CheckBox;
import android.widget.CompoundButton;
import android.widget.TextView;
import java.time.LocalDateTime;
import java.time.format.DateTimeFormatter;

import android.hardware.Sensor;
import android.hardware.SensorManager;
import android.hardware.SensorEvent;
import android.hardware.SensorEventListener;
import android.hardware.TriggerEvent;
import android.hardware.TriggerEventListener;

public class SampleActivity extends Activity implements SensorEventListener {
    private SensorEventListener mSensorEventListener = null;
    private TriggerEventListener mTriggerEventListener = null;
    private SensorManager mSensorManager = null;

    // Defined custom sensor type
    private static final int TYPE_CONTROLLER_ACCELEROMETER = 0x00100001;
    private static final int TYPE_HEADSET_TAP = 0x00102001;

    private Sensor mAccSensor = null;
    private CheckBox mCheckBox_acc = null;
    private TextView mTextView_accData = null;

    private Sensor mCAccSensor = null;
    private CheckBox mCheckBox_cacc = null;
    private TextView mTextView_caccData = null;

    private Sensor mTapSensor = null;
    private CheckBox mCheckBox_tap = null;
    private TextView mTextView_tapData = null;
    private TextView mTextView_tapEventTime = null;

    private Sensor mStaSensor = null;
    private CheckBox mCheckBox_sta = null;
    private TextView mTextView_staData = null;
    private TextView mTextView_staEventTime = null;

    @Override
    protected void onCreate(Bundle savedInstanceState) {
        super.onCreate(savedInstanceState);
        setContentView(R.layout.activity_sample);

        getWindow().addFlags(WindowManager.LayoutParams.FLAG_KEEP_SCREEN_ON);
        setRequestedOrientation(ActivityInfo.SCREEN_ORIENTATION_LANDSCAPE);

        mSensorEventListener = this;
        mTriggerEventListener = new TriggerListener();

        mSensorManager = (SensorManager)getSystemService(SENSOR_SERVICE);

        // TYPE_ACCELEROMETER
        mTextView_accData = (TextView) this.findViewById(R.id.textView_accData);
        mCheckBox_acc = (CheckBox) this.findViewById(R.id.checkBox_acc);
        mCheckBox_acc.setOnCheckedChangeListener(new CompoundButton.OnCheckedChangeListener() {
            @Override
            public void onCheckedChanged(CompoundButton buttonView, boolean isChecked) {
                if (isChecked) {
                    mAccSensor = mSensorManager.getDefaultSensor(Sensor.TYPE_ACCELEROMETER);
                    mSensorManager.registerListener(mSensorEventListener, mAccSensor, SensorManager.SENSOR_DELAY_NORMAL);
                } else {
                    mSensorManager.unregisterListener(mSensorEventListener, mAccSensor);
                }
            }
        });

        // TYPE_CONTROLLER_ACCELEROMETER
        mTextView_caccData = (TextView) this.findViewById(R.id.textView_caccData);
        mCheckBox_cacc = (CheckBox) this.findViewById(R.id.checkBox_cacc);
        mCheckBox_cacc.setOnCheckedChangeListener(new CompoundButton.OnCheckedChangeListener() {
            @Override
            public void onCheckedChanged(CompoundButton buttonView, boolean isChecked) {
                if (isChecked) {
                    mCAccSensor = mSensorManager.getDefaultSensor(TYPE_CONTROLLER_ACCELEROMETER);
                    mSensorManager.registerListener(mSensorEventListener, mCAccSensor, SensorManager.SENSOR_DELAY_NORMAL);
                } else {
                    mSensorManager.unregisterListener(mSensorEventListener, mCAccSensor);
                }
            }
        });

        // TYPE_STATIONARY_DETECT
        mTextView_staData = (TextView) this.findViewById(R.id.textView_staData);
        mCheckBox_sta = (CheckBox) this.findViewById(R.id.checkBox_sta);
        mTextView_staEventTime = (TextView) this.findViewById(R.id.textView_staTime);
        mCheckBox_sta.setOnCheckedChangeListener(new CompoundButton.OnCheckedChangeListener() {
            @Override
            public void onCheckedChanged(CompoundButton buttonView, boolean isChecked) {
                if (isChecked) {
                    mStaSensor = mSensorManager.getDefaultSensor(Sensor.TYPE_STATIONARY_DETECT);
                    mSensorManager.requestTriggerSensor(mTriggerEventListener, mStaSensor);
                }
            }
        });

        // TYPE_HEADSET_TAP
        mTextView_tapData = (TextView) this.findViewById(R.id.textView_tapData);
        mCheckBox_tap = (CheckBox) this.findViewById(R.id.checkBox_tap);
        mTextView_tapEventTime = (TextView) this.findViewById(R.id.textView_tapTime);
        mCheckBox_tap.setOnCheckedChangeListener(new CompoundButton.OnCheckedChangeListener() {
            @Override
            public void onCheckedChanged(CompoundButton buttonView, boolean isChecked) {
                if (isChecked) {
                    mTapSensor = mSensorManager.getDefaultSensor(TYPE_HEADSET_TAP);
                    mSensorManager.registerListener(mSensorEventListener, mTapSensor, SensorManager.SENSOR_DELAY_NORMAL);
                } else {
                    mSensorManager.unregisterListener(mSensorEventListener, mTapSensor);
                }
            }
        });
    }

    @Override
    protected void onPause() {
        super.onPause();
        if (mSensorManager != null) {
            mSensorManager.unregisterListener(this);
        }
    }

    @Override
    public void onAccuracyChanged(Sensor sensor, int accuracy) {
    }

    @Override
    public void onSensorChanged(SensorEvent event) {

        String data = "";
        for(int i = 0; i < event.values.length; i++) {
            data += String.format("%.3f", event.values[i]) + ", ";
        }

        switch(event.sensor.getType()) {
            case Sensor.TYPE_ACCELEROMETER:
                // Show sensor data
                mTextView_accData.setText(data);
                break;
            case TYPE_CONTROLLER_ACCELEROMETER:
                // Show sensor data and
                mTextView_caccData.setText(data);
                break;
            case TYPE_HEADSET_TAP:
                // Show sensor data and time of occurring event
                mTextView_tapData.setText(data);
                mTextView_tapEventTime.setText(getNowTime());
                break;
        }
    }

    public class TriggerListener extends TriggerEventListener {
        @Override
        public void onTrigger(TriggerEvent e) {
            switch(e.sensor.getType()) {
                case Sensor.TYPE_STATIONARY_DETECT:
                    // Show sensor data and time of occurring event
                    mTextView_staData.setText(String.format("%.3f", e.values[0]));
                    mTextView_staEventTime.setText(getNowTime());
                    if(mCheckBox_sta.isChecked()) mCheckBox_sta.setChecked(false);
                    break;
            }
        }
    }

    private String getNowTime() {
        LocalDateTime nowDate = LocalDateTime.now();
        DateTimeFormatter dtf1 = DateTimeFormatter.ofPattern("yyyy/MM/dd/HH:mm:ss.SSS");
        String formatNowDate = dtf1.format(nowDate);
        return formatNowDate;
    }
}
- Manifest file (AndroidManifest.xml)
<?xml version="1.0" encoding="utf-8"?>
<LinearLayout
    xmlns:android="http://schemas.android.com/apk/res/android"
    android:orientation="vertical"
    android:layout_width="match_parent"
    android:layout_height="match_parent">

    <ScrollView
        android:layout_width="match_parent"
        android:layout_height="match_parent"
        android:isScrollContainer="false"
        android:id="@+id/scrollView">

        <LinearLayout
            android:id="@+id/LinearLayout"
            android:orientation="vertical"
            android:layout_height="match_parent"
            android:layout_width="match_parent">

            <!-- TYPE_ACCELEROMETER -->
            <LinearLayout
                android:layout_width="wrap_content"
                android:layout_height="wrap_content"
                android:orientation="horizontal">
                <CheckBox
                    android:id="@+id/checkBox_acc"
                    android:layout_width="match_parent"
                    android:layout_height="wrap_content"
                    android:layout_weight="2"
                    android:text="TYPE_ACCELEROMETER" />
                <Space
                    android:layout_width="5dip"
                    android:layout_height="match_parent" />
                <TextView
                    android:id="@+id/textView_accData"
                    android:layout_width="match_parent"
                    android:layout_height="wrap_content"
                    android:layout_weight="1"
                    android:text="data" />
            </LinearLayout>

            <!-- TYPE_CONTROLLER_ACCELEROMETER -->
            <LinearLayout
                android:layout_width="wrap_content"
                android:layout_height="wrap_content"
                android:orientation="horizontal">
                <CheckBox
                    android:id="@+id/checkBox_cacc"
                    android:layout_width="match_parent"
                    android:layout_height="wrap_content"
                    android:layout_weight="2"
                    android:text="TYPE_CONTROLLER_ACCELEROMETER" />
                <Space
                    android:layout_width="5dip"
                    android:layout_height="match_parent" />
                <TextView
                    android:id="@+id/textView_caccData"
                    android:layout_width="match_parent"
                    android:layout_height="wrap_content"
                    android:layout_weight="1"
                    android:text="data" />
            </LinearLayout>

            <Space
                android:layout_width="match_parent"
                android:layout_height="10dip" />

            <!-- TYPE_STATIONARY_DETECT -->
            <LinearLayout
                android:layout_width="wrap_content"
                android:layout_height="wrap_content"
                android:orientation="horizontal">

                <CheckBox
                    android:id="@+id/checkBox_sta"
                    android:layout_width="match_parent"
                    android:layout_height="wrap_content"
                    android:layout_weight="2"
                    android:text="TYPE_STATIONARY_DETECT" />
                <Space
                    android:layout_width="5dip"
                    android:layout_height="match_parent" />
                <TextView
                    android:id="@+id/textView_staData"
                    android:layout_width="match_parent"
                    android:layout_height="wrap_content"
                    android:layout_weight="1"
                    android:text="data" />
                <Space
                    android:layout_width="5dip"
                    android:layout_height="match_parent" />
                <TextView
                    android:id="@+id/textView_staTime"
                    android:layout_width="match_parent"
                    android:layout_height="wrap_content"
                    android:layout_weight="2"
                    android:text="event time" />
            </LinearLayout>

            <Space
                android:layout_width="match_parent"
                android:layout_height="10dip" />

            <!-- TYPE_HEADSET_TAP -->
            <LinearLayout
                android:layout_width="wrap_content"
                android:layout_height="wrap_content"
                android:orientation="horizontal">
                <CheckBox
                    android:id="@+id/checkBox_tap"
                    android:layout_width="match_parent"
                    android:layout_height="wrap_content"
                    android:layout_weight="2"
                    android:text="TYPE_HEADSET_TAP" />
                <Space
                    android:layout_width="5dip"
                    android:layout_height="match_parent" />
                <TextView
                    android:id="@+id/textView_tapData"
                    android:layout_width="match_parent"
                    android:layout_height="wrap_content"
                    android:layout_weight="1"
                    android:text="data" />
                <Space
                    android:layout_width="5dip"
                    android:layout_height="match_parent" />
                <TextView
                    android:id="@+id/textView_tapTime"
                    android:layout_width="match_parent"
                    android:layout_height="wrap_content"
                    android:layout_weight="2"
                    android:text="event time" />
            </LinearLayout>

            <Space
                android:layout_width="match_parent"
                android:layout_height="10dip" />

        </LinearLayout>

    </ScrollView>

</LinearLayout>

