Moverio Basic Function SDK
Developer's Guide for Unity plug-in
2. Application development
2.1. Quick start
This guide will show you how to set up your development environment and try out the Moverio Basic Function UnityPlugin sample.

Requirements
Hardware
- An Android smartphone equipped with a USB Type-C port as standard and compatible with DisplayPort Alternate Mode on USB Type-C
- Moverio compatible with Moverio Basic Function UnityPlugin > For Moverio compatible with Moverio Basic Function UnityPlugin, please check the Moverio Basic Function SDK Developer's Guide.
- USB Type-C cable to connect Android smart phone to your PC
Software
- Unity 2021.3.45f1 or later
- Make sure to include Android Build Support during installation
- Download Moverio Basic Function UnityPlugin 1.1.1 > The SDK is downloaded as MoverioBasicFunctionUnityPlugin_1.1.1.unitypackage.
- Android SDK 7.0 (API Level 24) or later installed using the Android Studio SDK Manager
Creating a Unity project
- Open Unity and create a new 3D project.
- Import the Moverio Basic Function UnityPlugin.
- Select Assets> Import Package> Custom Package.
- Select the downloaded MoverioBasicFunctionUnityPlugin_1.1.2.unitypackage.
- In the Importing Package dialog, make sure all options are selected and click Import.
Open sample scene
-
Find and open the Menu scene in Unity's Project window. > Assets > MoverioBasicFunctionUnityPlugin > Samples > Menu > Scenes

Configure build settings
- Open the Build Settings window from File> Build Settings.
- Select Android and click Switch Platform.
- Click Platform Settings in the Build Settings window.
- In the Inspector window, configure Player Settings as follows:
| configuration | value |
|---|---|
| Player Settings > Other Settings > Package Name | Create a unique app ID using the Java package name format. For example, com.example.helloMoverio |
| Player Settings > Other Settings > Minimum API Level | Android 7.0 'Nougat' (API level 24) or higher |
Build and run the sample

- Enable developer options and USB debugging on your Android smartphone.
- Connect your Android smartphone to your PC.
- In the Unity Build Settings window, click Build and Run.
- Remove your Android smartphone from your PC and then connect it to Moverio.
- Tap the button of the sample you want to check.
Limitations of the sample
- This sample was created with Unity 2021.3.45f1.
- It will not work with Unity2018 or earlier versions.
2.2. How to migrate from Moverio Basic Function UnityPlugin version 1.1.1 to version 1.1.2
- Import a new Moverio Basic Function UnityPlugin.
- Select Assets > Import Package > Custom Package.
- Select the downloaded version of MoverioBasicFunctionUnityPlugin_1.1.2.unitypackage.
- In the Importing Package dialog, make sure that all options are selected and click Import.
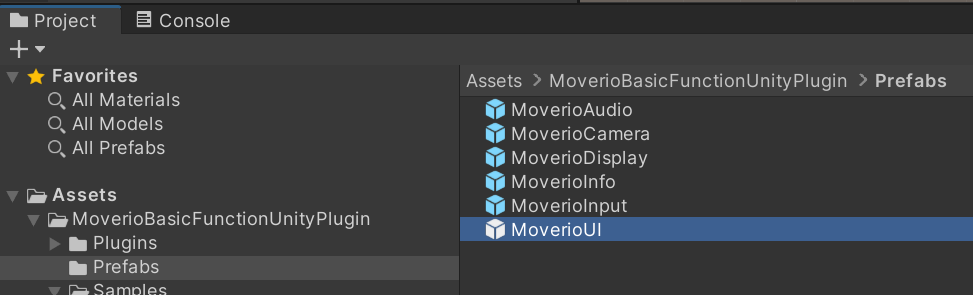
- Delete the MoverioUI.prefab in Assets > MoverioBasicFunctionUnityPlugin > Prefabs.
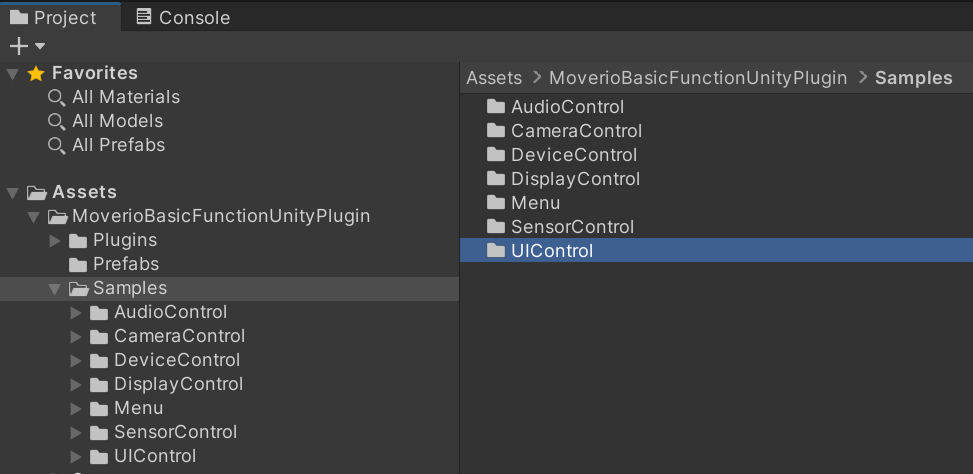
- Remove the UIControl from Assets > MoverioBasicFunctionUnityPlugin > Samples.
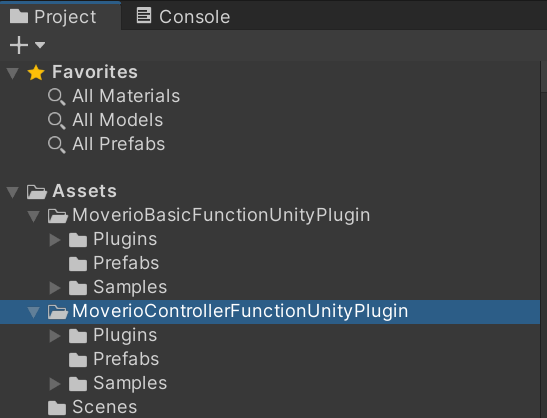
- If you are using MoverioUI, import the MoverioControllerFunctionUnityPlugin.
- select Assets > Import Package > Custom Package.
- select the downloaded version of MoverioControllerFunctionUnityPlugin_1.0.0.unitypackage. In the Importing Package dialog, make sure that all options are selected and click Import.
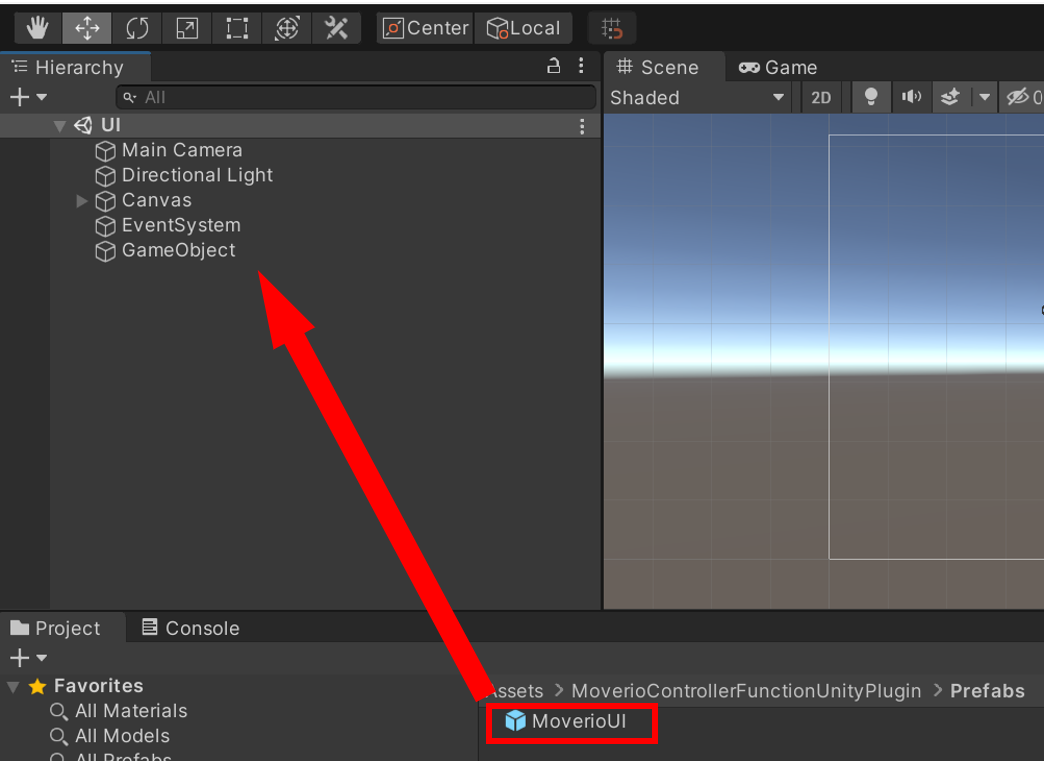
- Removes the MoverioUI from the Hierarchy window.
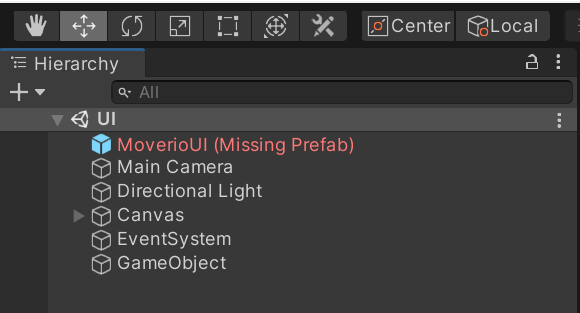
- Drag and drop the MoverioUI.prefab from Assets > MoverioControllerFunctionUnityPlugin > Prefabs into the Hierarchy window.
using MoverioControllerFunctionUnityPlugin; is described.
cs using MoverioControllerFunctionUnityPlugin;Set Player Settings > Other Settings > Minimum API Level to Android 9.0 'Nougat' (API level 28) or higher.
2.3. Display control
You can control the brightness of the Moverio display and switch between 2D / 3D display modes.
2.3.1 Function list
| function | contents |
|---|---|
| Display brightness control | Get / set display brightness |
| Brightness adjustment mode control | Get / set brightness adjustment mode |
| Display display mode control | Get / set display mode (2D or 3D) |
| Display display state control | Get / set display status |
| Controlling the virtual display distance of the display | Get / set the adjustment value of the virtual display distance of the display |
| Get the minimum adjustment value for the virtual display distance of the display | Get the minimum adjustable value |
| Get the maximum adjustment value of the virtual display distance of the display | Get the maximum adjustable value |
| Reconnect | Moverio reconnect |
The above function is implemented by DisplayControl of the sample scene.

| label | function |
|---|---|
| Brightness | Display brightness control |
| Brightness Mode | Brightness adjustment mode control |
| Display Mode | Display display mode control |
| Display State | Display display state control |
| Screen Horizontal Shift Step | Controlling the virtual display distance of the display |
| Screen Horizontal Shift Step Min | Get the minimum adjustment value for the virtual display distance of the display |
| Screen Horizontal Shift Step Max | Get the maximum adjustment value of the virtual display distance of the display |
| Reconnect | Reconnect |
For details on the functions, refer to MoverioBasicFunction SDK Developer's Guide.
2.3.2. Display control tutorial
This section describes how to control display with the Unity app.
-
Create a Unity project and import the package
Refer to Create a Unity project for how to create
-
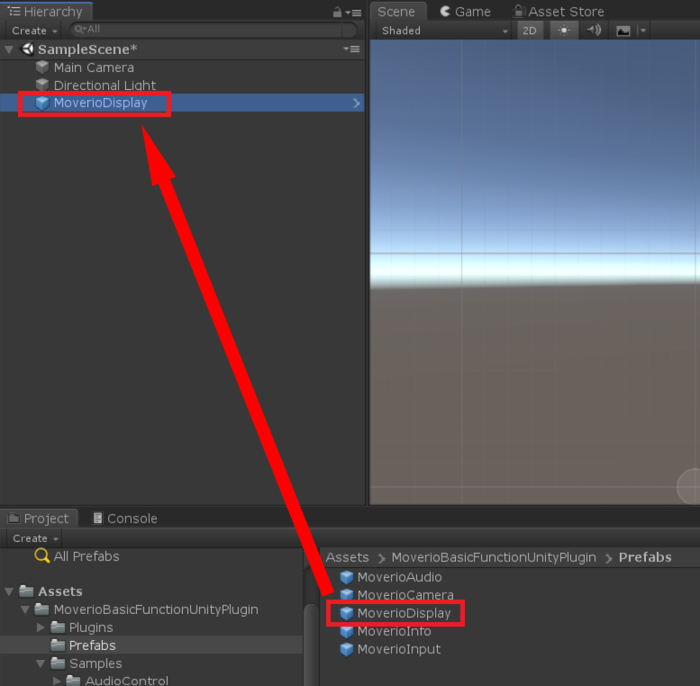
Drag and drop MoverioDisplay into the hierarchy window
-
Create a script

-
Add using
Open the script created in 3 and describe as using MoverioBasicFunctionUnityPlugin;
using MoverioBasicFunctionUnityPlugin; -
Call a function
Describe the API you want to use like MoverioDisplay.GetBrightness
Refer to the following script for the description method of each function
label
script
Brightness
GetBrighnessController.cs
SetBrightnessController.csBrightness Mode
GetBrighnessModeController.cs
SetBrightnessModeController.csDisplay Mode
GetDisplayModeController.cs
SetDisplayModeController.csDisplay State
GetDisplayStateController.cs
SetDisplayStateController.csScreen Horizontal Shift Step
GetScreenHorizontalShiftStepController.cs
SetScreenHorizontalShiftStepController.csScreen Horizontal Shift Step Max
GetScreenHorizontalShiftStepMaxController.cs
Screen Horizontal Shift Step Min
GetScreenHorizontalShiftStepMinController.cs
Attach script to GameObject
Please refer to API Reference for API specifications.
2.4. Camera control
You can control the camera installed in Moverio.
2.4.1. Function list
| function | contents |
|---|---|
| Still image shooting | Still image shooting |
| Video shooting | Video shooting |
| Preview display | Preview display |
| Capture data acquisition | Capture data acquisition |
| Brightness control | Brightness acquisition / setting |
| Get minimum brightness | Get minimum brightness |
| Get maximum brightness | Get maximum brightness |
| White balance mode control | Get / set white balance mode |
| Gain control | Gain acquisition / setting |
| Get maximum gain | Get maximum gain |
| Get minimum gain | Get minimum gain |
| Focus distance control | Focus distance acquisition / setting |
| Get maximum focus distance | Get maximum focus distance |
| Get minimum focus distance | Get minimum focus distance |
| Exposure compensation mode control | Get / set exposure compensation mode |
| Manual exposure compensation step control | Get / set manual exposure compensation step |
| Get minimum manual exposure compensation step | Get the minimum manual exposure compensation step |
| Get maximum manual exposure compensation step | Get maximum manual exposure compensation step |
| Focus mode control | Get / set focus mode |
| Resolution control | Get / set resolution |
| Power line frequency control | Power line frequency acquisition / setting |
| Frame rate control | Get / set frame rate |
| Indicator mode control | Get / set indicator mode |
| Reconnect | Moverio reconnect |
The above function is implemented by CameraControl of sample scene

| label | function |
|---|---|
| Take picture | Still image shooting |
| Start/Stop record | Video shooting |
| Brightness | Brightness control |
| Brightness Min | Get minimum brightness |
| Brightness Max | Get maximum brightness |
| White balance mode | White balance mode control |
| Gain | Gain control |
| Gain Min | Get minimum gain |
| Gain Max | Get maximum gain |
| Focus distance | Focus distance control |
| Focus distance Min | Get minimum focus distance |
| Focus distance Max | Get maximum focus distance |
| Exposure compensation mode | Exposure compensation mode control |
| Exposure compensation step | Manual exposure compensation step control |
| Exposure compensation step Min | Get minimum manual exposure compensation step |
| Exposure compensation step Max | Get maximum manual exposure compensation step |
| Focus mode | Focus mode control |
| Resolution | Resolution control |
| Power line frequency | Power line frequency control |
| Farame rate | Frame rate control |
| Indicator mode | Indicator mode control |
| Reconnect | Moverio reconnect |
Please refer to Moverio Basic Function SDK Developer's Guide for details of the function.
2.4.2. Camera control tutorial
Preview display
This section describes how to control camera with the Unity app.
-
Create a Unity project and import the package
Refer to Create a Unity project for how to create
-
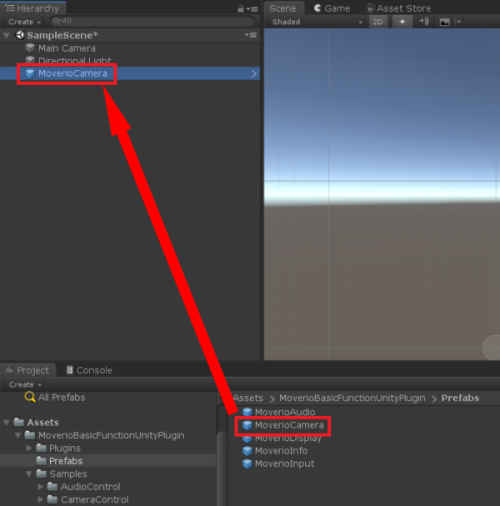
Drag and drop MoverioCamera into the hierarchy window

-
Create a Render Texture

-
Click Moverio Camera in the Hierarchy window

-
Drag and drop the Render Texture created in 3. to the Camera Preview Render Texture in the Moverio Camera Inspector.

-
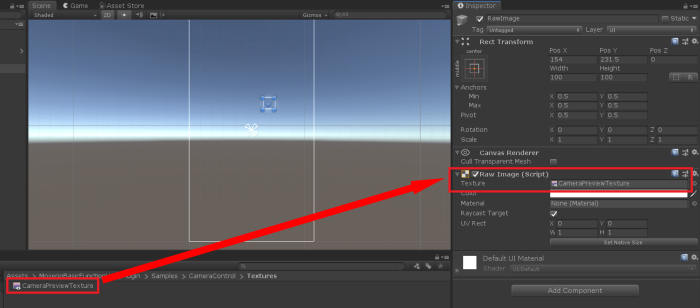
Create a raw image

-
Drag and drop the Render Texture created in 3. to the Raw Image (Script) Texture in the Raw Image Inspector created in 6.
Capture data acquisition
Describes how to acquire capture data.
-
Create a Unity project and import the package
Refer to Create a Unity project for how to create
-
Drag and drop MoverioCamera into the hierarchy window

-
Create a script

-
Create a function to acquire capture data
public void OnCaptureData(byte[] data) { } -
Attach script to GameObject
-
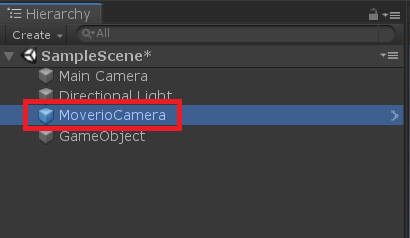
Click MoverioCamera in the Hierarchy window

-
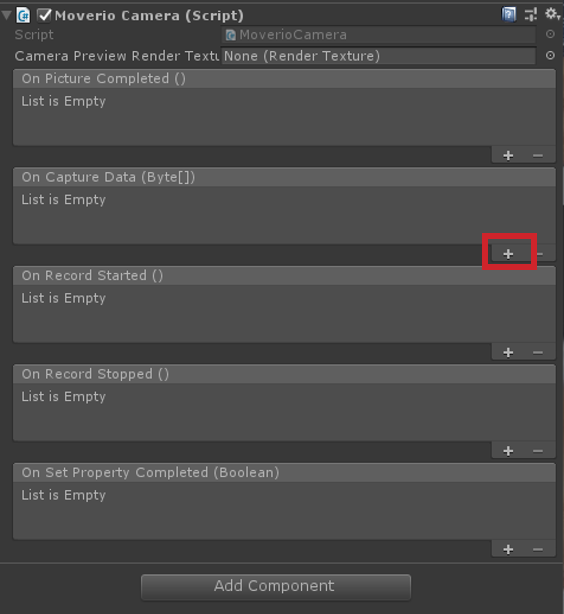
Click the "+" on the Moverio Camera (Script) On Capture Data in the MoverioCamera Inspector to add an event.
-
Drag and drop the GameObject to which the script was attached in step 5 in the hierarchy window to the event.
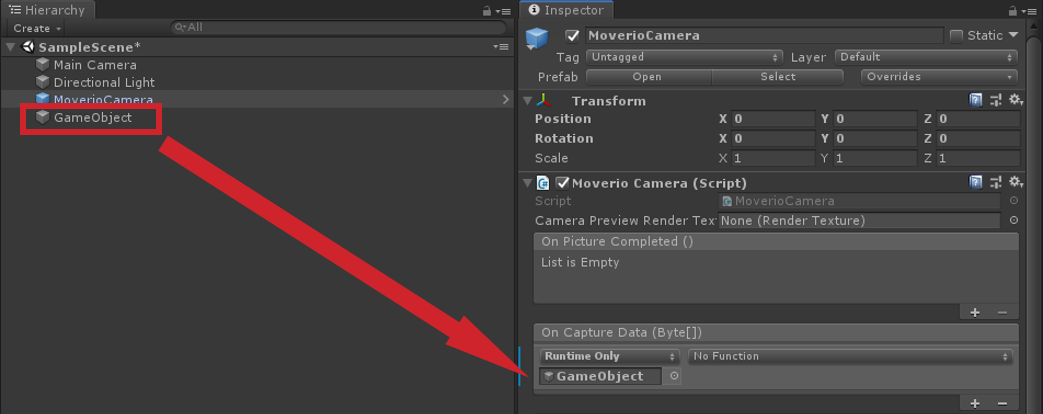
-
Select the function to receive the On Capture Data event notification.

Please refer to API Reference for API specifications.
Still image shooting
Describes how to shoot still image.
-
Create a Unity project and import the package
Refer to Create a Unity project for how to create
-
Drag and drop MoverioCamera into the hierarchy window

-
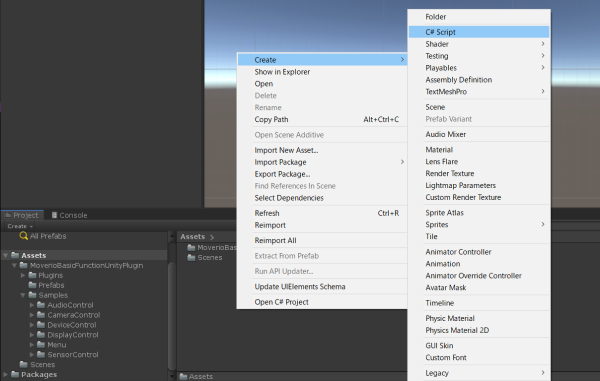
Create a script

-
Add using
Open the script created in 3 and describe as using MoverioBasicFunctionUnityPlugin;
using MoverioBasicFunctionUnityPlugin; -
Call a function
Describe the API you want to use like MoverioCamera.TakePicture
Refer to the following script for the description method of each function
label
script
Take picture
TakePictureController.cs
-
Create a function to receive notification of completion of still image shooting
public void OnPictureCompleted() { } -
Attach script to GameObject
-
Click Moverio Camera in the Hierarchy window

-
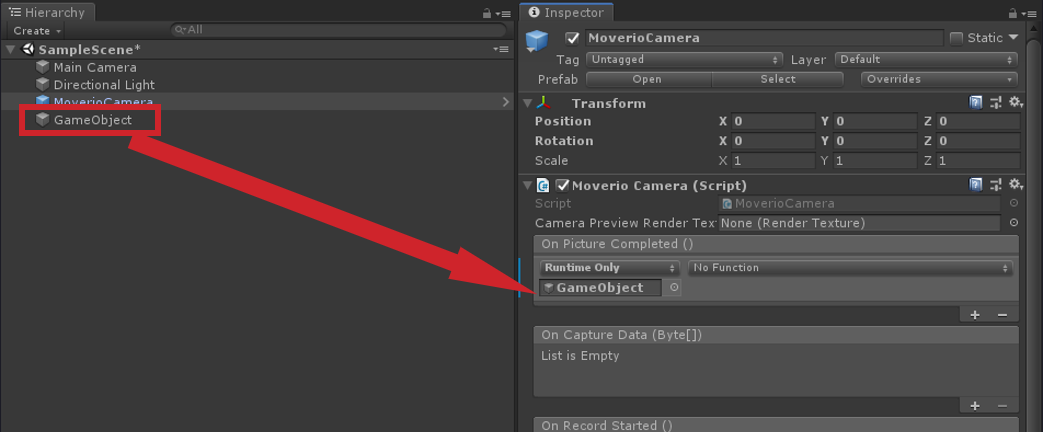
Click the "+" on Moverio Camera (Script) On Picture Completed in the MoverioCamera Inspector to add an event.

-
Drag and drop the GameObject to which the script was attached in 7. in the hierarchy window to the event.
-
Select the function to receive the On Picture Completed event notification.

Please refer to API Reference for API specifications.
Video shooting
Describes how to shoot video.
-
Create a Unity project and import the package
Refer to Create a Unity project for how to create
Drag and drop MoverioCamera into the hierarchy window
Create a script

-
Add using
Open the script created in 3 and describe as�using MoverioBasicFunctionUnityPlugin;
using MoverioBasicFunctionUnityPlugin; -
Call a function
Describe the API you want to use like MoverioCamera.StartRecord or MoverioCamera.StopRecord
Refer to the following script for the description method of each function
label
script
Start record
VideoRecordController.cs
Stop record
VideoRecordController.cs
-
Create a function to be notified of the start and completion of video recording
public void OnRecordStarted() { } public void OnRecordStopped() { } -
Attach script to GameObject
-
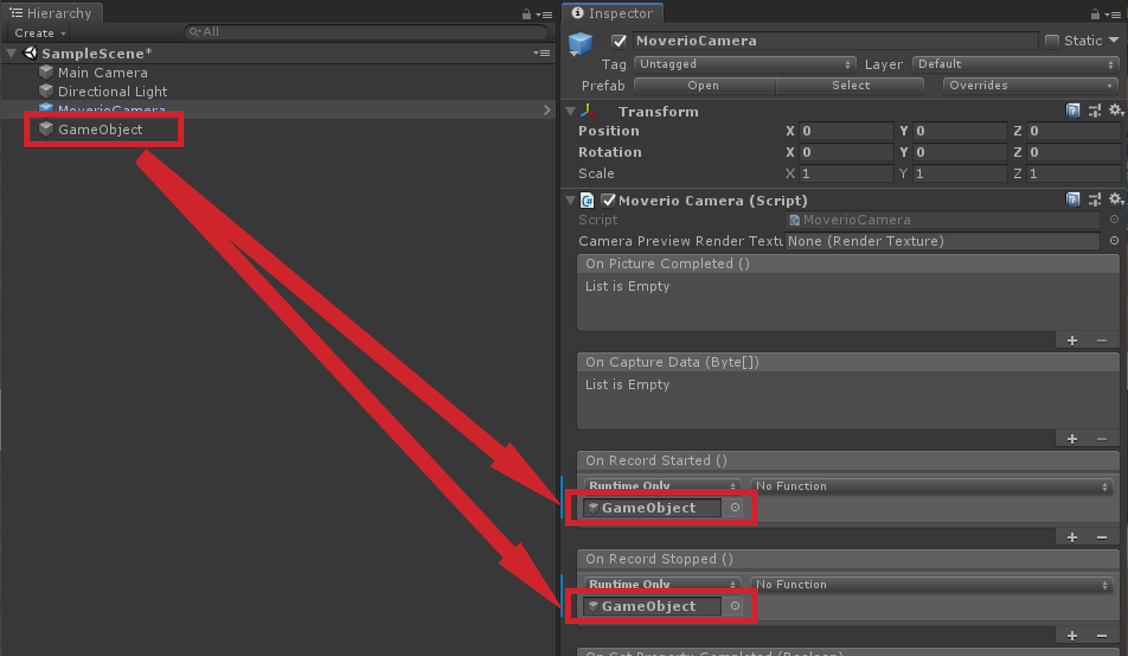
Click MoverioCamera in the Hierarchy window
-
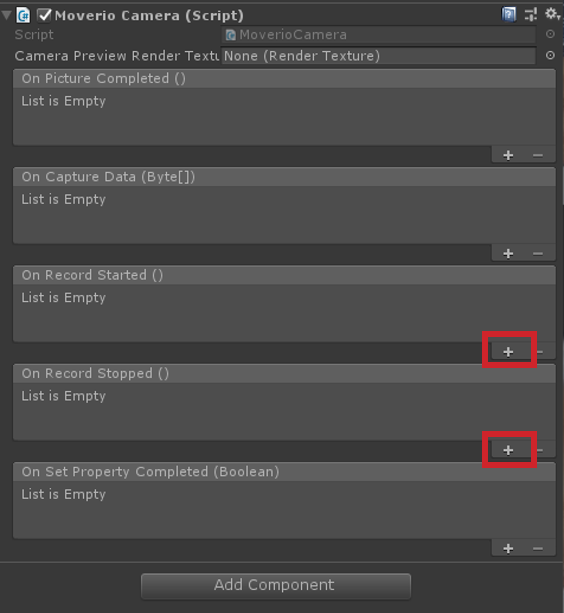
Click the Moverio Camera (Script) On Rcord Started and On Record Stopped "+" in the MoverioCamera Inspector to add an event.
-
Drag and drop the GameObject to which the script is attached in 7. in the hierarchy window to each event.
-
Select the function to receive On Rcord Started and On Record Stopped event notifications.

Please refer to API Reference for API specifications.
Change camera property
Describes how to change camera property.
-
Create a Unity project and import the package
Refer to Create a Unity project for how to create
-
Drag and drop MoverioCamera into the hierarchy window
-
Create a script
-
Add using
Open the script created in 3 and describe as using MoverioBasicFunctionUnityPlugin;
using MoverioBasicFunctionUnityPlugin; Call a function
-
Get MoverioCamera.CameraProperty with ** MoverioCamera.GetProperty **
-
Describe the property for which you want to change the settings.
Refer to the following script for the description method of each function
label script Brightness SetPropertyController.cs White balance mode SetPropertyController.cs Gain SetPropertyController.cs Focus distance SetPropertyController.cs Exposure compensation mode SetPropertyController.cs Exposure compensation step SetPropertyController.cs Focus mode SetPropertyController.cs Resolution SetPropertyController.cs Power line frequency SetPropertyController.cs Farame rate SetPropertyController.cs Indicator mode SetPropertyController.cs -
Set the MoverioCamera.CameraProperty whose settings have been changed with ** MoverioCamera.SetProperty **
-
-
Create a function to receive notification of camera property setting completion
public void OnSetPropertyCompleted(bool result) { } -
Attach script to GameObject
-
Click Moverio Camera in the Hierarchy window

-
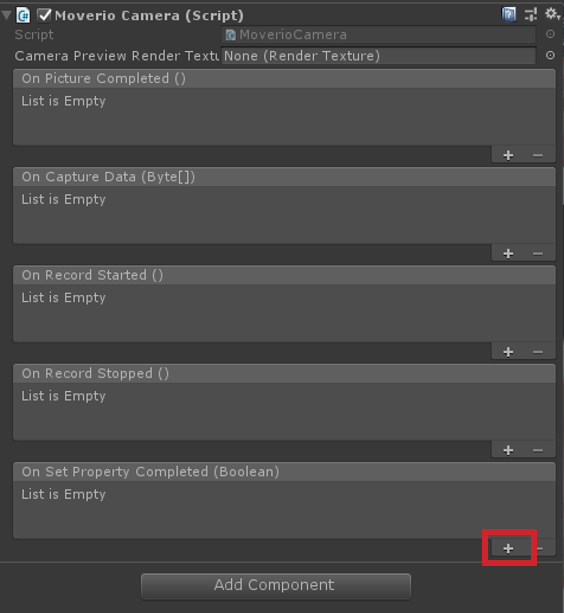
Click the "+" on Moverio Camera (Script) On Set Property Completed in the MoverioCamera Inspector to add an event.
-
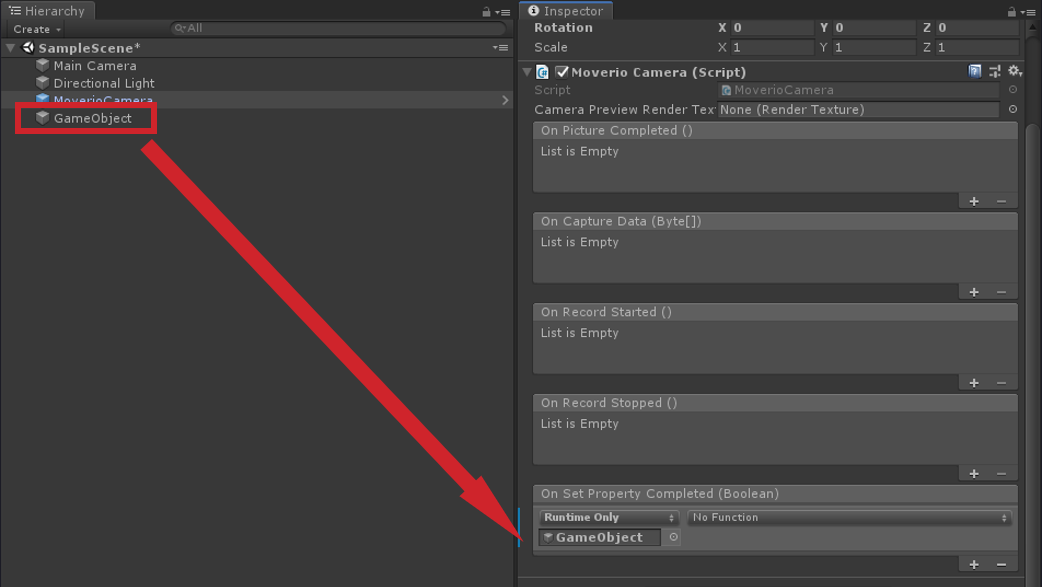
Drag and drop the GameObject to which the script is attached in 7. in the hierarchy window to each event.
-
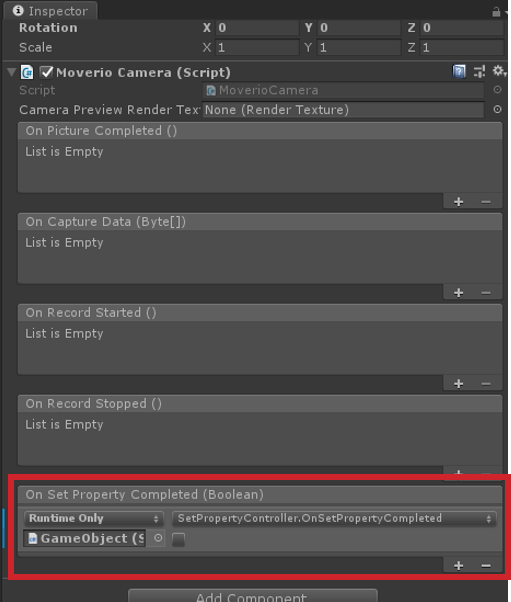
Select the function to receive the On Set Property Completed event notification.
Please refer to API Reference for API specifications.
2.5. Sensor control
You can get the data of the sensor mounted on the Moverio headset.
2.5.1 Function list
| function | contents |
|---|---|
| Sensor value acquisition | Get the value of the sensor |
| Sensor accuracy acquisition | Get sensor accuracy |
| Reconnect | Moverio reconnect |
The above function is implemented by SensorControl / SensorControlRotation / SensorControlHeadset / SensorControlUncalibrated of sample scene

| label | scene |
|---|---|
| Accelerometer | SensorControl |
| Magnetic field | SensorControl |
| Gyroscope | SensorControl |
| Ambient light | SensorControl |
| Gravity | SensorControl |
| Linear accelerometer | SensorControl |
| Rotation vector | SensorControlRotation |
| Game Rotation vector | SensorControlRotation |
| Headset Tap Detect | SensorControlHeadset |
| Headset Motion Detect | SensorControlHeadset |
| Headset Stationary Detect | SensorControlHeadset |
| Uncalibrated Accelerometer | SensorControlUncalibrated |
| Uncalibrated Magnetic field | SensorControlUncalibrated |
| Uncalibrated Gyroscope | SensorControlUncalibrated |
Please refer to Moverio Basic Function SDK Developer's Guide for details of the function.
2.5.2 Sesor control tutorial
Sensor value acquisition method (other than Headset Detect)
This section describes how to control sensor with the Unity app.
-
Create a Unity project and import the package
Refer to Create a Unity project for how to create
-
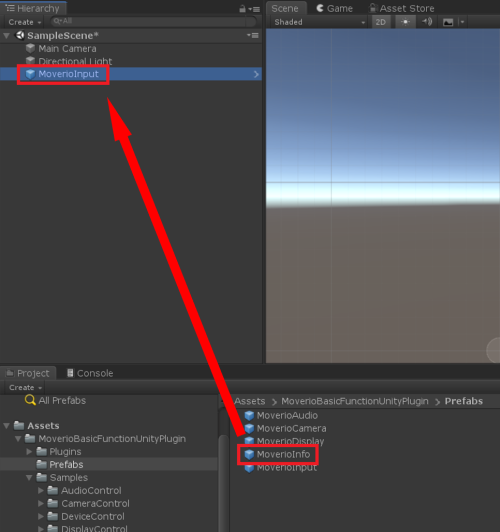
Drag and drop MoverioInput into the hierarchy window
-
Create a script

-
Add using
Open the script created in 3 and describe as using MoverioBasicFunctionUnityPlugin;
using MoverioBasicFunctionUnityPlugin; -
Call a function
Describe the API you want to use like MoverioInput.GetAccAccuracy
Refer to the following script for the description method of each function
label script Accelerometer AccelerometerController.cs Magnetic field MagneticFieldController.cs Gyroscope GyroscopeController.cs Ambient light LightController.cs Gravity GravityController.cs Linear accelerometer LinearAccelerometerController.cs Rotation vector RotationVectorController.cs Game Rotation vector GameRotationVectorController.cs Uncalibrated Accelerometer AccelerometerUncalibratedController.cs Uncalibrated Magnetic field MagneticFieldUncalibratedController.cs Uncalibrated Gyroscope GyroscopeUncalibratedController.cs -
Attach script to GameObject
Please refer to API Reference for API specifications.
Headset Detect value acquisition method (other than Headset Detect)
This section describes how to control Headset Detect acquisition with the Unity app.
-
Create a Unity project and import the package
Refer to Create a Unity project for how to create
-
Drag and drop MoverioInput into the hierarchy window

-
Create a script

-
Add using
Open the script created in 3 and describe as using MoverioBasicFunctionUnityPlugin.Type;
using MoverioBasicFunctionUnityPlugin.Type; -
Create a function to be notified of Headset Detect
public void OnHeadsetTapDetect(SensorDataAccuracy accuracy) { } public void OnHeadsetMotionDetect(SensorDataAccuracy accuracy) { } public void OnHeadsetStationayDetect(SensorDataAccuracy accuracy) { } -
Attach script to GameObject
-
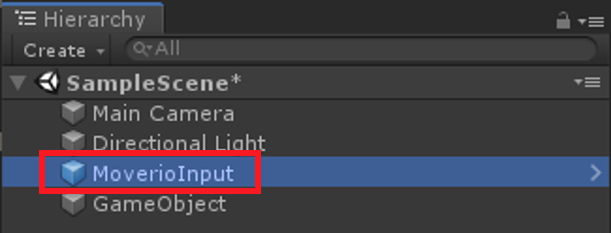
Click Moverio Input in the Hierarchy window
-
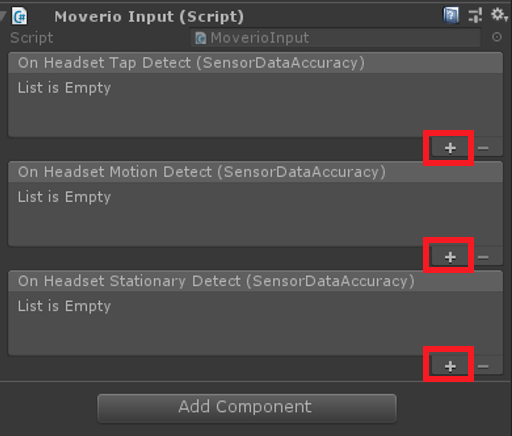
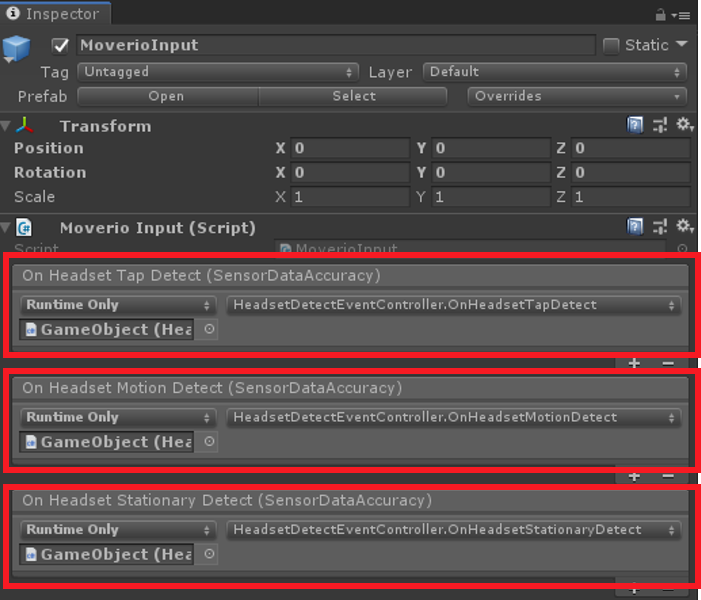
Click the Moverio Input (Script) On Headset Tap Detect and On Headset Motion Detect and On Headset Stationay Detect "+" in the MoverioInput Inspector to add an event.
-
Drag and drop the GameObject to which the script is attached in 6. in the hierarchy window to each event.

-
Select the function to receive On Rcord Started and On Record Stopped event notifications.
Please refer to API Reference for API specifications.
2.6. Audio control
You can adjust the volume of the earphones connected to Moverio.
2.6.1 Function list
| function | contents |
|---|---|
| Volume control | Get/set earphone volume |
| Minimum volume acquisition | Get the minimum volume that can be set |
| Maximum volume acquisition | Get maximum configurable volume |
| Maximum volume upper limit mode setting | Setting the maximum mode for maximum volume of earphone output |
| Device mode control | Get/set audio input/output device modes |
| Audio gain step control | Get/set gain adjustment steps for built-in speakers |
| Get minimum audio gain step | Get minimum audio gain step for built-in speakers |
| Get maximum audio gain step | Get maximum audio gain step for built-in speakers |
| Reconnect | Reconnecting Moverio |
The above function is implemented by AudioControl of sample scene
| label | function |
|---|---|
| Volume | Audio Control |
| Volume Min | Minimum volume acquisition |
| Volume Max | Maximum volume acquisition |
| Volume Limit Mode | Maximum volume upper limit mode setting |
| Device Mode | Device mode control |
| Gain Step | Gain step control |
| Gain Step Min | Get minimum audio gain step |
| Gain Step Max | Get maximum audio gain step |
| Reconnect | Reconnect |
Please refer to Moverio Basic Function SDK Developer's Guide for details of the function.
2.6.2 Audio control tutorial
This section describes how to control audio with the Unity app.
-
Create a Unity project and import the package
Refer to Create a Unity project for how to create
-
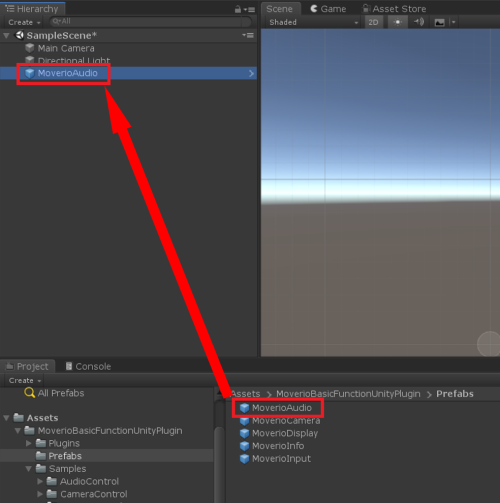
Drag and drop MoverioAudio into the hierarchy window
-
Create a script

-
Add using
Open the script created in 3 and describe as using MoverioBasicFunctionUnityPlugin;
using MoverioBasicFunctionUnityPlugin; -
Call a function
Describe the API you want to use like MoverioAudio.GetVolume
Refer to the following script for the description method of each function
label script Volume GetVolumeController.cs
SetVolumeController.csVolume Min VolumeMinController.cs Volume Max VolumeMaxController.cs Volume Limit Mode VolumeLimitModeController.cs Device Mode GetDeviceModeController.cs
SetDeviceModeController.csGain Step GetGainStepController.cs
SetGainStepController.csGain Step Min GainStepMinController.cs Gain Step Max GainStepMaxController.cs -
Attach script to GameObject
Please refer to API Reference for API specifications.
2.7. Device state management
You can manage the temperature status and system status of various devices installed in Moverio.
2.7.1 Function list
| Function | Contents |
|---|---|
| Headset system status notification | Headset connect/disconnect notification |
| Get headset serial number | |
| Product name acquisition | Acquisition of headset product name |
| Reconnect | Reconnecting Moverio |
The above function is implemented by DeviceControl in the sample scene

| Label | Function |
|---|---|
| Headset attached and detached | Headset system status notification |
| Headset serial number | Get headset serial number |
| Headset product name | Product name acquisition |
| Reconnect | Reconnect |
Please refer to Moverio Basic Function SDK Developer's Guide for details of the function.
2.7.2 Device state management tutorial
Device state management
This section describes how to manage the device status with the Unity app.
-
Create a Unity project and import the package
Refer to Create a Unity project for how to create
-
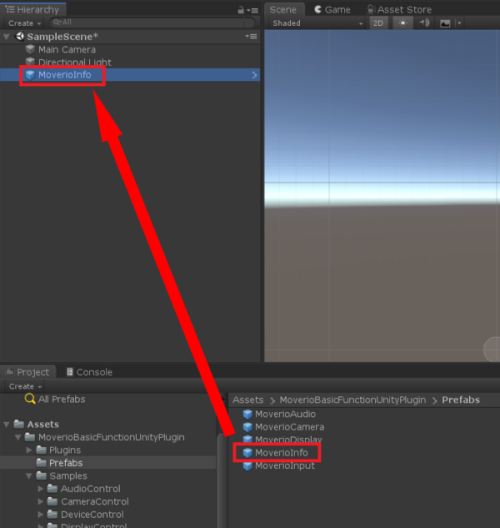
Drag and drop MoverioInfo into the hierarchy window
-
Create a script

-
Add using
Open the script created in 3 and describe as using MoverioBasicFunctionUnityPlugin;
using MoverioBasicFunctionUnityPlugin; -
Call the function
Describe the API you want to use like MoverioInfo.GetHeadsetSerialNumber
Refer to the following script for the description method of each function.
Label Script Headset serial number GetSerialNumberController.cs Headset product name GetProductNameController.cs -
Attach the script to the GameObject
Please refer to API Reference for API specifications.
Headset system status notification
This section describes how to receive the headset system status notification in the Unity app.
-
Create a Unity project and import the package
Refer to Create a Unity project for how to create
-
Drag and drop MoverioInfo into the hierarchy window

-
Create a script

-
Create a function to be notified of headset connection/disconnection
public void OnHeadsetAttached() { } public void OnHeadsetDetached() { } -
Attach the script to the GameObject
-
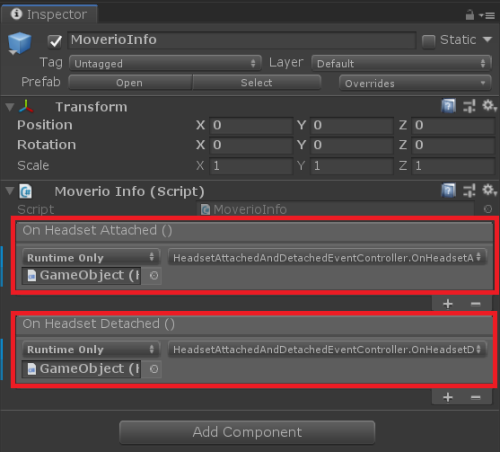
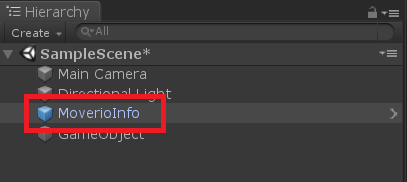
Click MoverioInfo in the hierarchy window
-
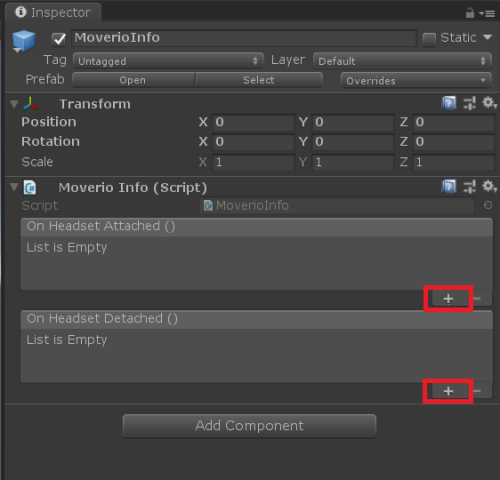
Add an event by clicking "+" of On Headset Attached or On HeadSset Detached of Moverio Info (Script) in the Inspector of MoverioInfo
-
Drag and drop the GameObject to which the script is attached in step 5 in the hierarchy window to the event.
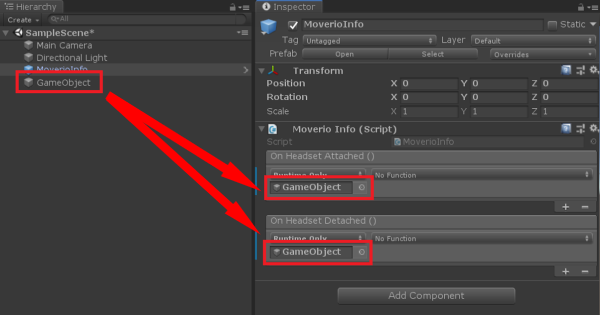
-
Select the function to receive the On Headset Attached or On Headset Detached event notification